

Simple Samples
In this series, we'll look at a few self
contained examples, with a single ASM file to do a task.

 |
Lesson
S1 - Moving a sprite on RiscOS In this lesson we'll write a simple program to show a smiley on the screen, and move it around the screen with the cursor keys. |
 |
 ROS_Keypad.asm |
 |
Starting our program
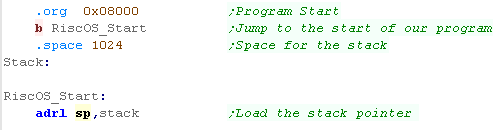
| For RISC OS to run our program, it needs to start at memory
address 0x8000, we do this with an Org statement We need to set up a valid stack for our program, and allocate some space for it, We put this at the start of our program, and skip over the allocated space with a branch command. |
 |
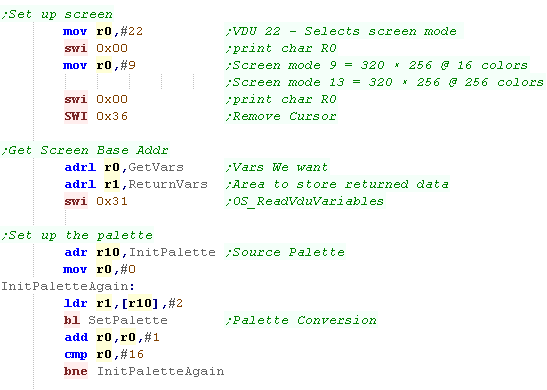
| We need to turn on the screen - we do this with SWI 0 - we're
using screen mode 9 here (320x256 16 color).... SWI 0 sends
characters to the screen, and special character codes perform
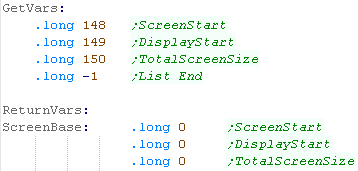
screen operations. We need to get the 'screen base' - this is the address in RAM of the data which is the pixels of the screen, SWI 0x31 does this. Next we need to set up our palette, We use a function we've written called 'SetPalette' to set each color. |
  |
| Setting the palette is also done by sending special control characters to the screen, we need to send one nibble per color channel to the screen, and turn off flashing | 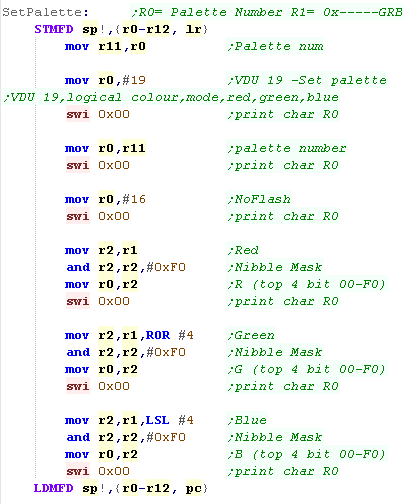 |
| Our palette routine uses 3 nibbles in the format -GRB... the top nibble is unused. |  |
Drawing a sprite
| We're going to move a 8x8 smiley around the screen | 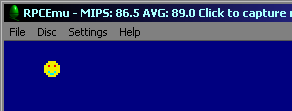 |
| Here is our smiley sprite, each color is defined by one nibble, but the top nibble is the right pixel of the pair, and the bottom nibble is the left pixel. | 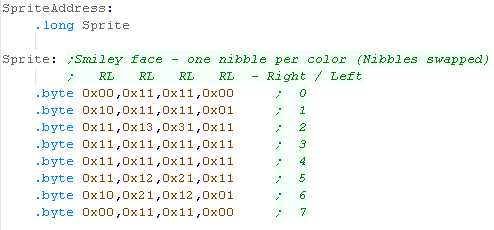 |
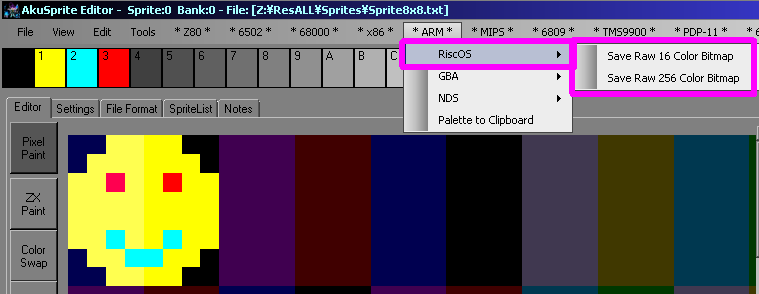
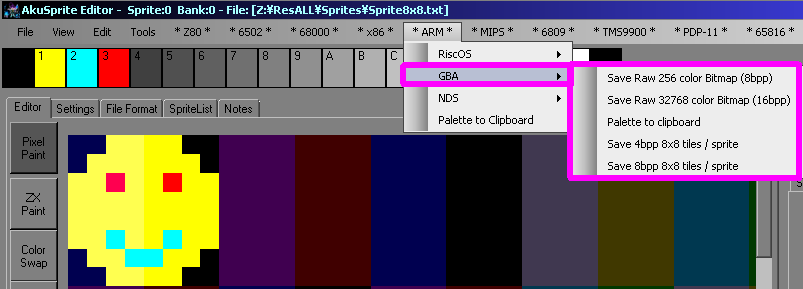
| You can use my Akusprite Editor to create files in the valid
format for the RISC-OS screen. It's free and open source - so you
have no excuse! You can learn more about AkuSprite Editor here. |
 |
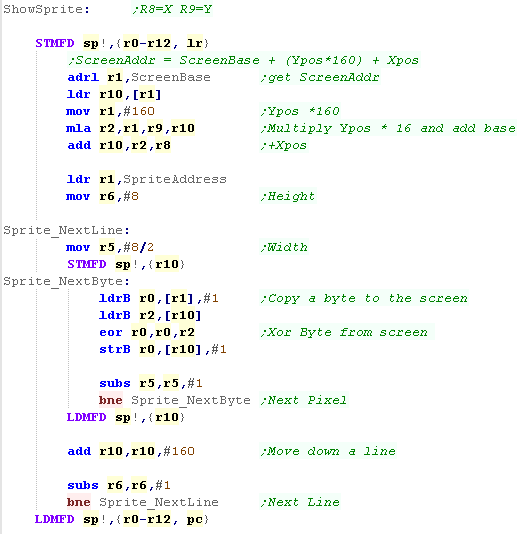
| We're going to create a sprite routine which will show the
sprite at an X,Y position in registers R8,R9. This uses XOR, meaning showing the sprite in the same position twice will remove it. We need to calculate the screen position for the sprite, the forumula is ScreenAddr = ScreenBase + (Ypos*160) + Xpos We then transfer all the bytes of the sprite to the screen. EORing in the current screen byte (the Xor effect) |
 |
Key reading and moving the sprite
| We define the starting position of the sprite, and show the starting smiley position with our showsprite routine. |  |
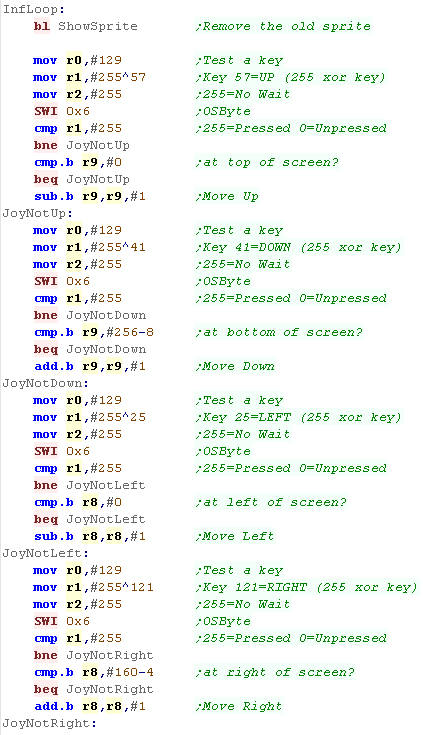
| We need to process the 4 directions. First we remove the old sprite We're using SWI 0x6 to test a key - this command is a little tricky, we need to load R0 with #129,R2 with #255, and R1 with a keycode (with all the bits flipped)... it will return 255 if the key is pressed. If a direction key is pressed, we then check the current smiley position - if it's already at the edge of the screen, we can't move again, but if we can, we move in the pressed direction. We repeat for all 4 directions Up, Down, Left and Right. |
 |
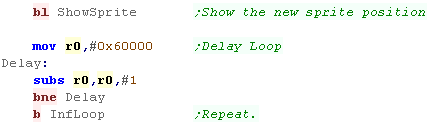
| Finally we show the new sprite position on screen. we then have a delay, to stop things moving too fast. |
 |
 |
This
program shows how to move a single sprite around the screen,
it's intended you could use this as a 'template' to make a
little game of your own. |

Starting our program
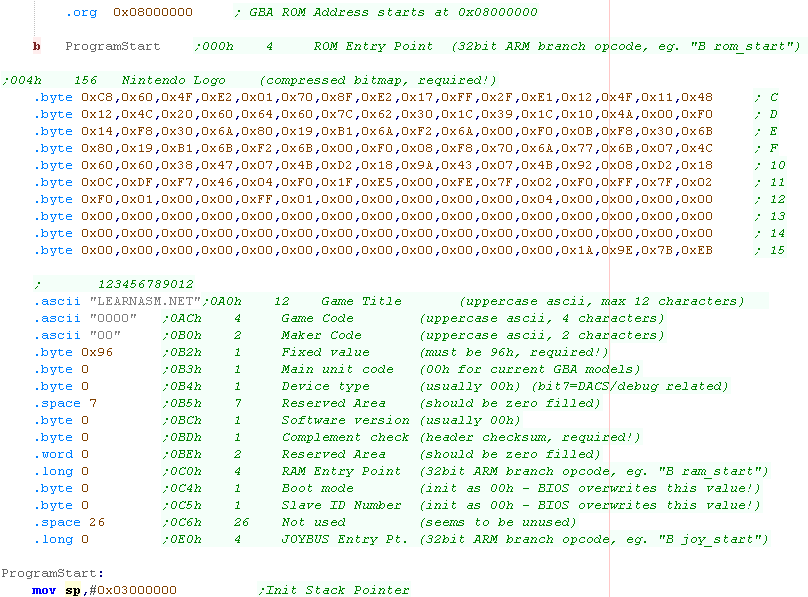
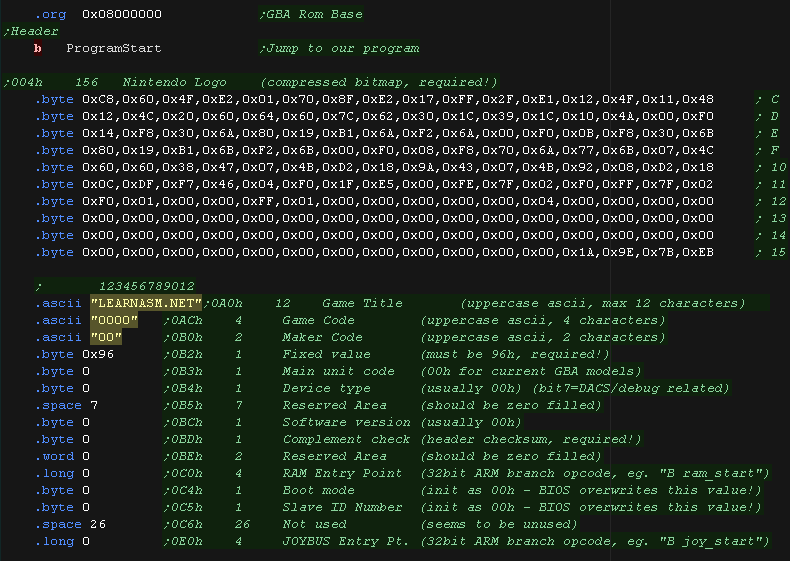
| Our cartridge needs to start with a header, it's pretty long,
but we don't need to worry about it's content, generally we can
just leave it as-is The cartridge starts at address 0x08000000, and the first thing is a jump to the actual code. The first thing that code does is set a valid stack pointer, at the top of RAM |
 |
| We need to turn on the screen - on the GBA this is easy, we just write 0x403 to port 0x04000000, this turns on a bitmap screen |  |
Drawing a sprite
| We're going to move a 8x8 smiley around the screen | 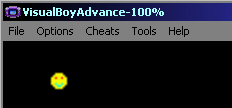 |
| We've defined our smiley as byte data... each pixel takes two bytes, 5 bits per color channel in the format ABBBBBGGGGGRRRRR (A=alpha) | 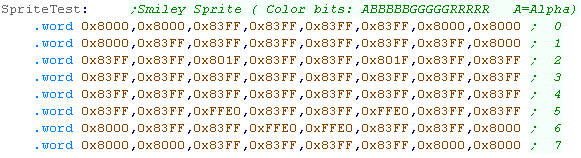 |
| You can use my Akusprite Editor to create files in the valid
format for the RISC-OS screen. It's free and open source - so
you have no excuse! You can learn more about AkuSprite Editor here. |
 |
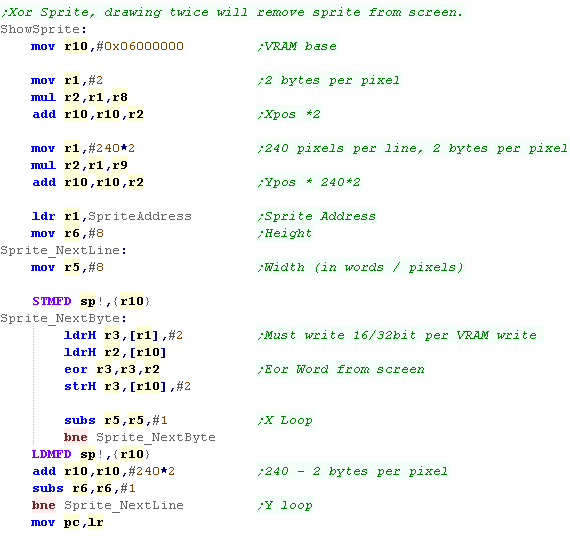
| We're going to create a sprite routine which will show the
sprite at an X,Y position in registers R8,R9. This uses XOR, meaning showing the sprite in the same position twice will remove it. We need to calculate the screen position for the sprite, each pixel is 2 bytes, and each line is 240 pixels, the screen base is 0x06000000 This gives us a screen address formula of 0x06000000 + (Ypos*240*2) + Xpos *2 We then transfer all the bytes of the sprite to the screen. EORing in the current screen byte (the Xor effect) |
 |
Joypad reading and moving the
sprite
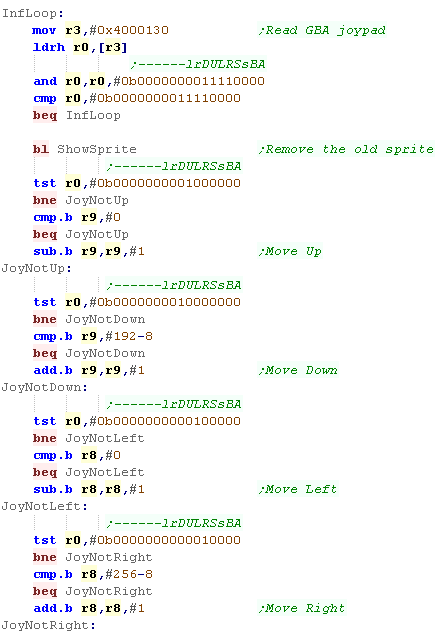
| We define the starting position of the sprite, and show the starting smiley position with our showsprite routine. | |
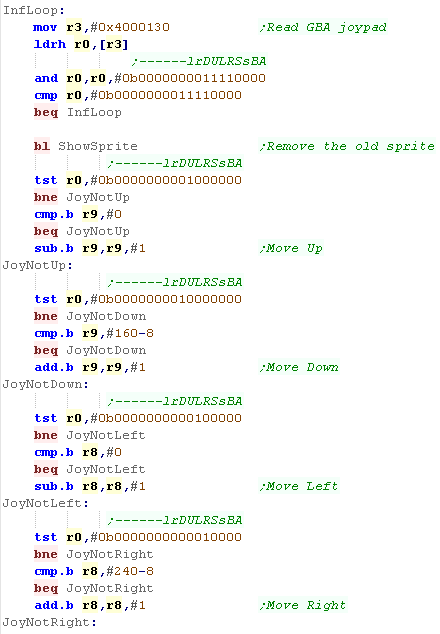
| We need to process the 4 directions. First we remove the old sprite We read in from port #0x4000130 - this tests the gamepad - each bit is a different direction. If a direction key is pressed, we then check the current smiley position - if it's already at the edge of the screen, we can't move again, but if we can, we move in the pressed direction. We repeat for all 4 directions Up, Down, Left and Right. |
 |
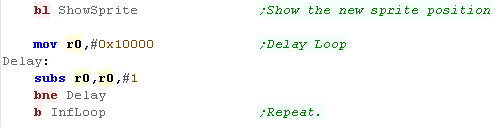
| Finally we show the new sprite position on screen. we then have a delay, to stop things moving too fast. |
 |
 |
We've used
bitmap mode here, which is the simplest to get you started. If you prefer, you can use Tiles and Sprites... you can find out more here |

Starting our program
| Our cartridge needs to start with a header, it's pretty
long, but we don't need to worry about it's content,
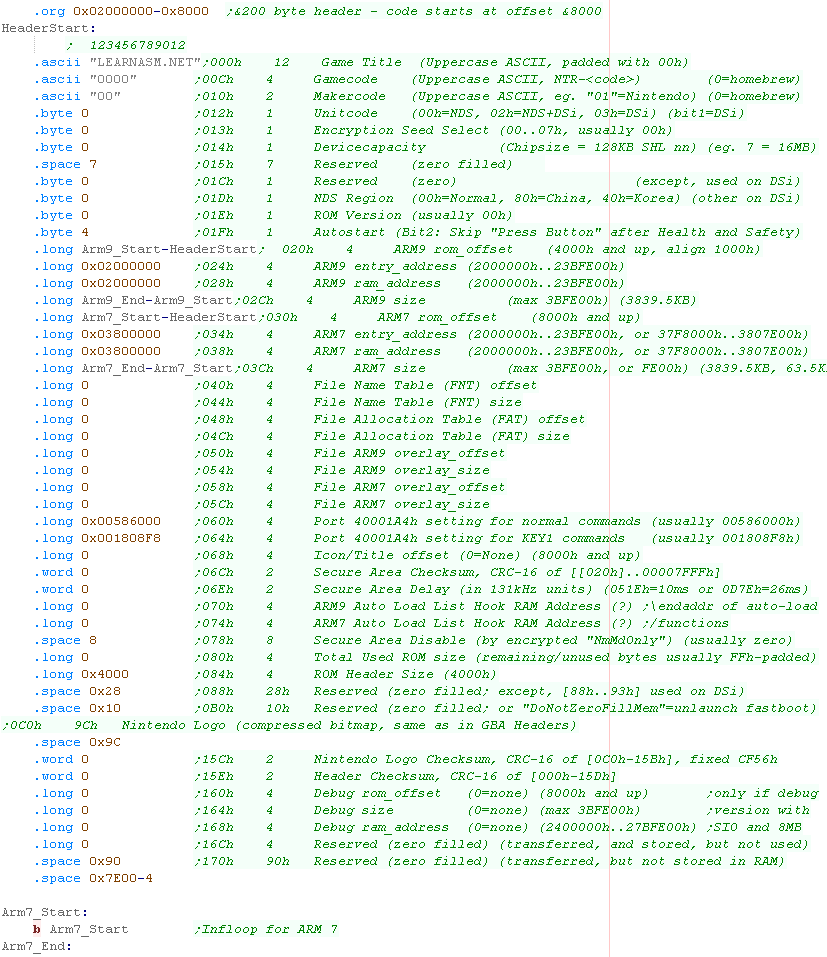
generally we can just leave it as-is The header defines where our program runs from in ram... we run from address 0x02000000. There is also a dummy Arm 7 program - we don't need the ARM7 for this example. |
 |
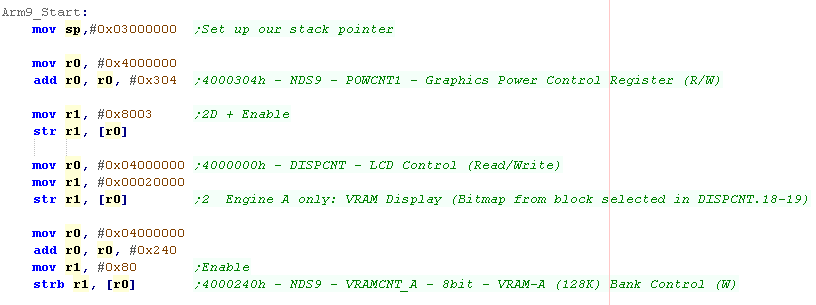
| We need to define a valid stack pointer - we point this to
the top of RAM Next we need to enable the display, we need to turn on the hardware, we do this by writing 0x8003 to port 0x4000304 We then select the bitmap display by writing 0x00020000 to 0x04000000 We finally need to turn on the VRAM, by writing 0x80 to port 0x04000000 |
 |
Drawing a sprite
| We're going to move a 8x8 smiley around the screen | 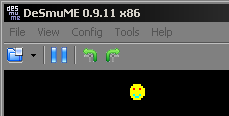 |
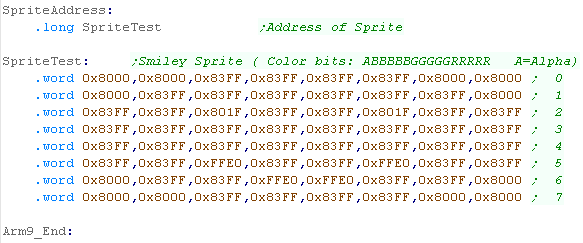
| We've defined our smiley as byte data... each pixel takes
two bytes, 5 bits per color channel in the format
ABBBBBGGGGGRRRRR (A=alpha) |
 |
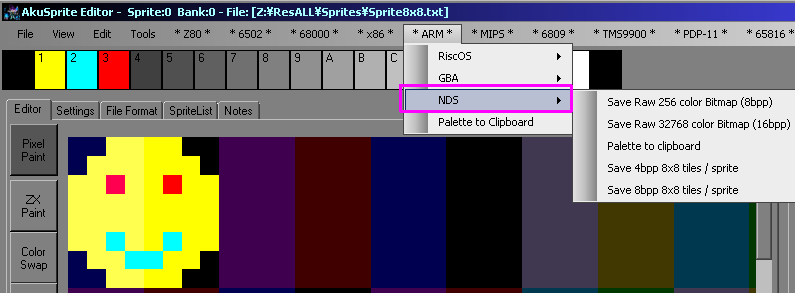
| You can use my Akusprite Editor to create files in the
valid format for the RISC-OS screen. It's free and open
source - so you have no excuse! You can learn more about AkuSprite Editor here. |
 |
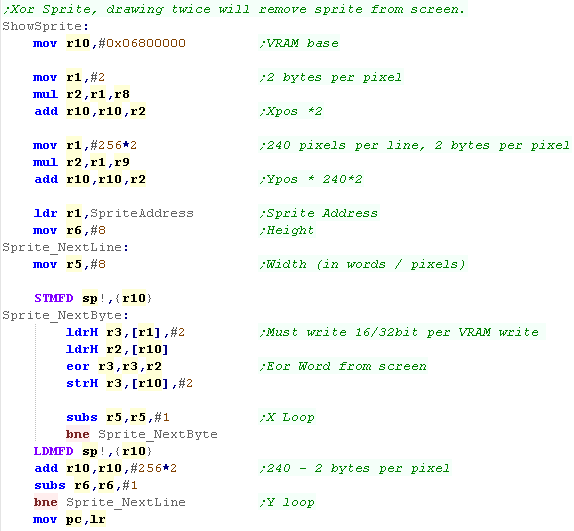
| We're going to create a sprite routine which will show the
sprite at an X,Y position in registers R8,R9. This uses XOR, meaning showing the sprite in the same position twice will remove it. We need to calculate the screen position for the sprite, each pixel is 2 bytes, and each line is 256 pixels, the screen base is 0x06800000 This gives us a screen address formula of 0x06800000 + (Ypos*256*2) + Xpos *2 We then transfer all the bytes of the sprite to the screen. EORing in the current screen byte (the Xor effect) |
 |
Joypad reading and moving the
sprite
| We define the starting position of the sprite, and show the starting smiley position with our showsprite routine. | |
| We need to process the 4 directions. First we remove the old sprite We read in from port #0x4000130 - this tests the gamepad - each bit is a different direction. If a direction key is pressed, we then check the current smiley position - if it's already at the edge of the screen, we can't move again, but if we can, we move in the pressed direction. We repeat for all 4 directions Up, Down, Left and Right. |
 |
| Finally we show the new sprite position on screen. we then have a delay, to stop things moving too fast. |
 |

| We need a tiny bit of ARM code to get our program running in THUMB mode, it's impossible to start the arm straight in THUMB - oh well, it's not 100% Thumb, but whacha gonna do!? |  |
Beginning a Gameboy Advance program
| Our ROM file needs to start at 0x08000000, Our rom starts with a
Branch to the main program. After that, We should have a 'generic header' to make the cartridge correct, though actually VisualBoyAdvance will work without any proper data here. |
 |
| When our program starts, it does so in ARM mode, so we first switch to THUMB with a BX command. | 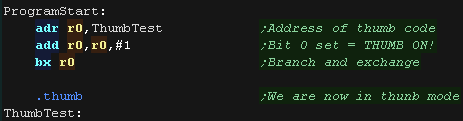 |
| Because of the THUMB limitations, we have to store our 32 bit values as data values, and load them into registers. | 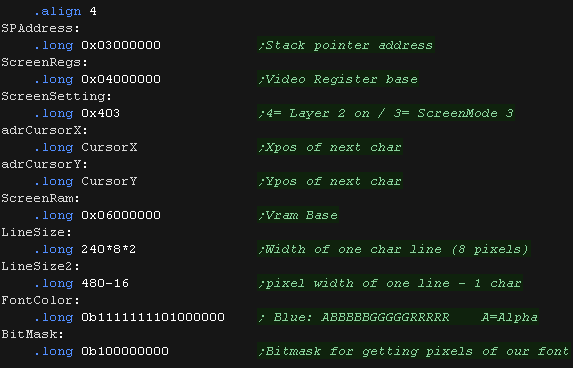 |
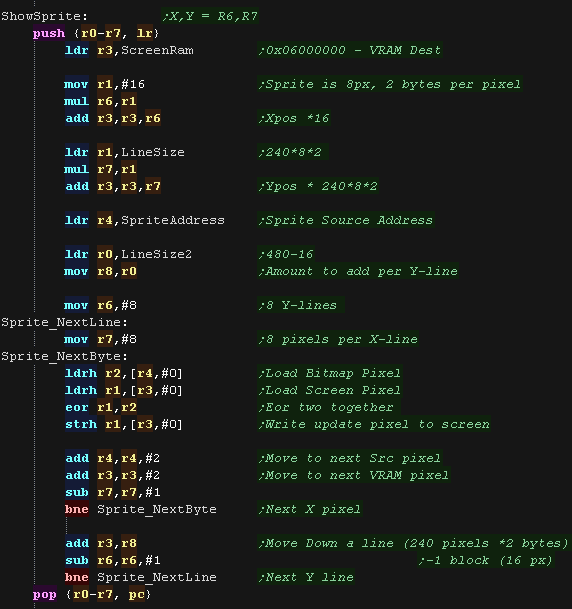
Our Sprite Routine
| Our sprite routine EORs (XORs) the bitmap data with the screen.
This means if we draw the sprite in the same position twice it
will be removed. We're now calculating the screen X,Y position using registers R6,R7. Our sprite is 8 pixels wide and each pixel is 2 bytes, so we multiply the Xpos by 16. Our sprite is 8 pixels tall and each line is 240 pixels wide and each pixel is 2 bytes, so we multiply the Ypos by 240*2*8. We add this to the screen base 0x06000000 . We load in our sprite address. We need to copy 2 bytes from our bitmap sprite to the screen for each pixel. We copy 16 bytes (8 pixels) from the sprite definition to the screen for each line of our sprite. We then move down a line of the screen, by adding 240*2 to the VRAM address. Each line is 240 pixels, and each pixel is 2 bytes. |
 |
Our Joystick Movement Routine
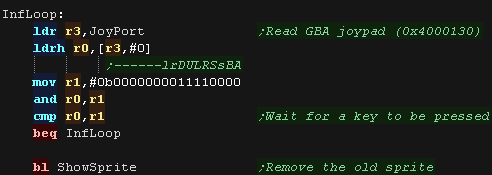
| We load our starting position of 10,10 into R6,R7 and show the sprite's starting position. |  |
| We read memory mapped port 0x4000130 to get the joypad
directions. This returns a word in the format '%------lrDULRSsBA'. We wait until a key is pressed, then we remove the old sprite, by drawing it again in the same position. As it's EORed (XOR) this removes the old sprite. |
 |
| We test the directions 'DULR' (Down, Up, Left, Right). In each case we see if the direction is pressed, and test if we're already at the screen edge. If not we move in that direction. |
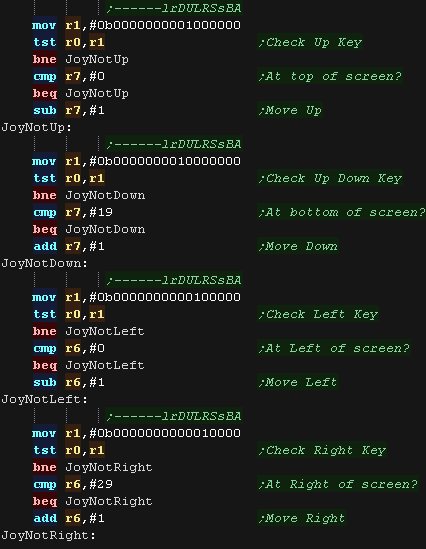 |
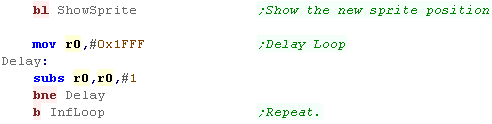
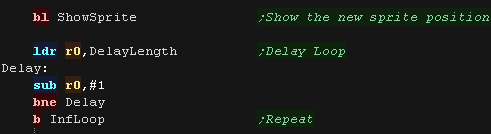
| We show the new location of the sprite. We then have a delay loop, then repeat. |
 |
| View Options |
| Default Dark |
| Simple (Hide this menu) |
| Print Mode (white background) |
| Top Menu |
| ***Main Menu*** |
| Youtube channel |
| Patreon |
| Introduction to Assembly (Basics for absolute beginners) |
| Amazon Affiliate Link |
| AkuSprite Editor |
| ChibiTracker |
| Dec/Bin/Hex/Oct/Ascii Table |
| Alt Tech |
| Archive.org |
| Bitchute |
| Odysee |
| Rumble |
| DailyMotion |
| Please note: I wlll upload more content to these alt platforms based on the views they bring in |
| 68000 Content |
| ***68000 Tutorial List*** |
Learn 68000 Assembly  |
| Hello World Series |
| Platform Specific Series |
| Simple Samples |
| Grime 68000 |
| 68000 Downloads |
| 68000 Cheatsheet |
| Sources.7z |
| DevTools kit |
| 68000 Platforms |
| Amiga 500 |
| Atari ST |
| Neo Geo |
| Sega Genesis / Mega Drive |
| Sinclair QL |
| X68000 (Sharp x68k) |
| 8086 Content |
| Learn 8086 Assembly |
| Platform Specific Series |
| Hello World Series |
| Simple Samples |
| 8086 Downloads |
| 8086 Cheatsheet |
| Sources.7z |
| DevTools kit |
| 8086 Platforms |
| Wonderswan |
| MsDos |
| ARM Content |
| Learn ARM Assembly |
| Learn ARM Thumb Assembly |
| Platform Specific Series |
| Hello World |
| Simple Samples |
| ARM Downloads |
| ARM Cheatsheet |
| Sources.7z |
| DevTools kit |
| ARM Platforms |
| Gameboy Advance |
| Nintendo DS |
| Risc Os |
| Risc-V Content |
| Learn Risc-V Assembly |
| Risc-V Downloads |
| Risc-V Cheatsheet |
| Sources.7z |
| DevTools kit |
| MIPS Content |
| Learn Risc-V Assembly |
| Platform Specific Series |
| Hello World |
| Simple Samples |
| MIPS Downloads |
| MIPS Cheatsheet |
| Sources.7z |
| DevTools kit |
| MIPS Platforms |
| Playstation |
| N64 |
| PDP-11 Content |
| Learn PDP-11 Assembly |
| Platform Specific Series |
| Simple Samples |
| PDP-11 Downloads |
| PDP-11 Cheatsheet |
| Sources.7z |
| DevTools kit |
| PDP-11 Platforms |
| PDP-11 |
| UKNC |
| TMS9900 Content |
| Learn TMS9900 Assembly |
| Platform Specific Series |
| Hello World |
| TMS9900 Downloads |
| TMS9900 Cheatsheet |
| Sources.7z |
| DevTools kit |
| TMS9900 Platforms |
| Ti 99 |
| 6809 Content |
| Learn 6809 Assembly |
| Learn 6309 Assembly |
| Platform Specific Series |
| Hello World Series |
| Simple Samples |
| 6809 Downloads |
| 6809/6309 Cheatsheet |
| Sources.7z |
| DevTools kit |
| 6809 Platforms |
| Dragon 32/Tandy Coco |
| Fujitsu FM7 |
| TRS-80 Coco 3 |
| Vectrex |
| 65816 Content |
| Learn 65816 Assembly |
| Hello World |
| Simple Samples |
| 65816 Downloads |
| 65816 Cheatsheet |
| Sources.7z |
| DevTools kit |
| 65816 Platforms |
| SNES |
| eZ80 Content |
| Learn eZ80 Assembly |
| Platform Specific Series |
| eZ80 Downloads |
| eZ80 Cheatsheet |
| Sources.7z |
| DevTools kit |
| eZ80 Platforms |
| Ti84 PCE |
| IBM370 Content |
| Learn IBM370 Assembly |
| Simple Samples |
| IBM370 Downloads |
| IBM370 Cheatsheet |
| Sources.7z |
| DevTools kit |
| Super-H Content |
| Learn SH2 Assembly |
| Hello World Series |
| Simple Samples |
| SH2 Downloads |
| SH2 Cheatsheet |
| Sources.7z |
| DevTools kit |
| SH2 Platforms |
| 32x |
| Saturn |
| PowerPC Content |
| Learn PowerPC Assembly |
| Hello World Series |
| Simple Samples |
| PowerPC Downloads |
| PowerPC Cheatsheet |
| Sources.7z |
| DevTools kit |
| PowerPC Platforms |
| Gamecube |
| Work in Progress |
| ChibiAndroids |
| Misc bits |
| Ruby programming |
Buy my Assembly programming book
on Amazon in Print or Kindle!


Available worldwide!
Search 'ChibiAkumas' on
your local Amazon website!
Click here for more info!

Buy my Assembly programming book
on Amazon in Print or Kindle!
Available worldwide!
Search 'ChibiAkumas' on
your local Amazon website!
Click here for more info!
Buy my Assembly programming book
on Amazon in Print or Kindle!
Available worldwide!
Search 'ChibiAkumas' on
your local Amazon website!
Click here for more info!