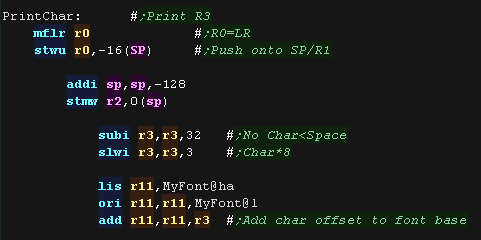
| We're gong to show a simple hello world message to the screen! | 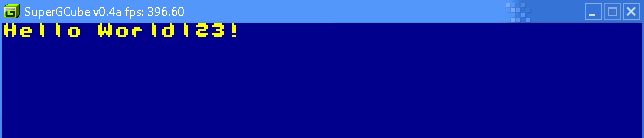 |
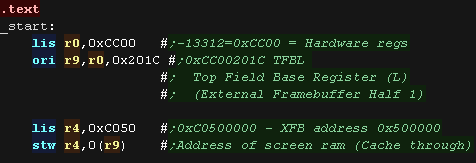
| We're going to use ELF2DOL to convert our program into a DOL
binary (It attaches a 256 byte header) We put our code in the '.text' section We need to set the address of our VRAM We're using 0xC0500000 for VRAM - the uncached version of 0x00500000 We write the address to the register 0xCC00201C (TFBL - Top Field Base Register (L) ) |
 |
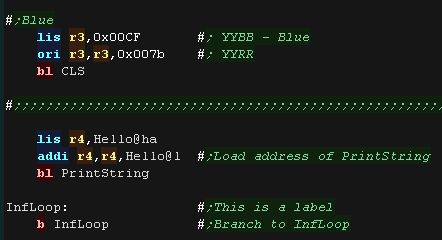
We need to clear our screen with CLS ! We load the Color word into R3 - in this case blue. we then write our message to the screen with PrintString, we load the string address into R4 Finally we drop into an infinite loop |
 |
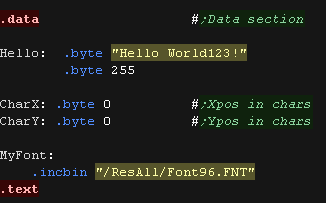
| We need to define our string in the '.data' segment. Our string is byte 255 terminated We also define a byte for the X and Y cursor position (in character blocks) This remembers the next position to draw a character. Finally we have the font file. Our font is an 8x8 pixel, one bit per pixel font, so each character is 8 bytes. It contains no character below space (chr 32) |
 |
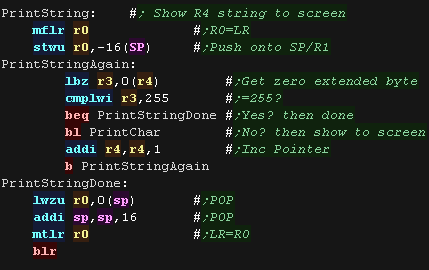
| Our PrintString routing simply reads in characters from R4 into
R3. Each is checked for a 255 - this is the end of the sequence. Anything else is printed to the screen via PrintChar |
 |
GameCube Graphics!
| In theory the Gamecube has a 640x480 display, however it only uses
4 bytes for every 2 pixels.
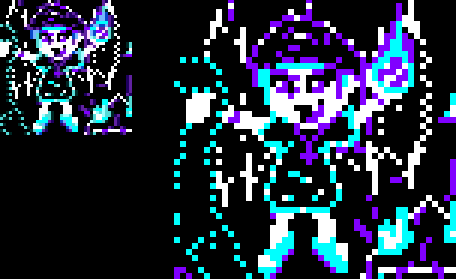
The gamecube uses a 'YUV' type display, where each pixel has a 8 bit brightness byte, but the color bytes are shared by neighboring pixels. Take a look at the images on the left... The small image was drawn at 1x, the one on the right is 2x... The colors on the left hand image are different in places, because of the shared color information. However If we treat the gamecube screen as 320x240, or 320x640 - halving the X axis, we can write the same color pixel to 4 bytes, and get the 'actual' colors we wanted! |
 |
MRGB-> YBR color
There's no way around itWe will need to convert our 24 bit RGB colors into the format for the Gamecube screen!
Color in RGB:Need help with your color maths??? I have a spreadsheet I used for the color conversions!
Download my 'Color conversion spreadsheet'

| Clearing the screen is easy, we just wipe all 0x25800 thirty two bit words of VRAM from address 0xC0500000 onwards | 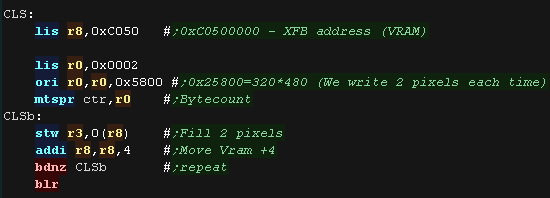 |
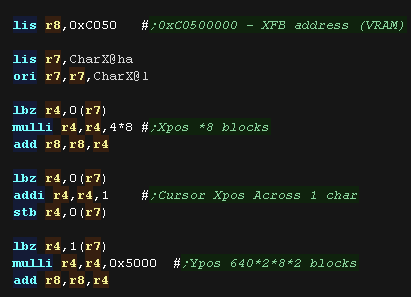
| The first stage of drawing a character is getting the font
source data. Our source font has no character below space, so we subtract 32 from the char num. Each character is 8 bytes, so we shift the result left 3 times. We add this to the font address |
 |
| Our font is 8x8 pixels, but we draw it doublesize to avoid the
'color problems' mentioned above, so one source pixel is a full 32
bit onscreen - and two lines tall. We take our Xpos and multiply it by 8x4, as each pixel is 2 bytes, and we draw 2 pixels at a time We take our Ypos and multiply it by 640x2x8x2, as each screen line is 640 pixels each pixel is 2 bytes, our font is 8 lines tall, and we draw each line twive onscreen., |
 |
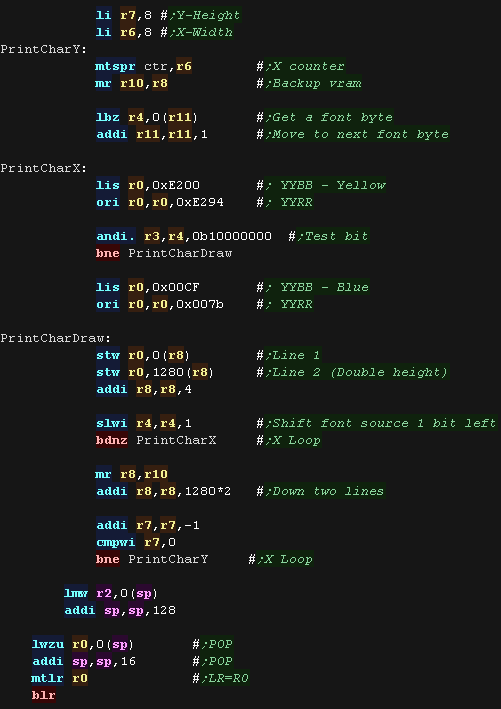
| OK we have our source in R11, and our destination
in R8! We load a byte of our font into R4 - this is enough data for one line of our font. We test a bit with ANDI, and set R0 to either Yellow or Blue depending if it was 1 or 0 We draw this to the screen vram in R8 (setting two pixels) we also set it to R8+1280 - setting the line below too - so each source pixel is a 2x2 block onscreen. We move down a pair of lines by adding 1280x2 We repeat for all the lines of our font. |
 |
| these tutorials use PowerPC-EABI
as an assembler, it's free and open source! We assemble it on the command line with the following command:  ASM Source file... %BuildFile% is the source file in this example it's a batch variable, but you may just want SAT_HelloWorld.asm here. Cpu Type... We specify the broadway yupr (gamecube cpu) Listing file... You don't need one, but a listing file shows what the assembler did, and can help with debugging. Regnames... We enable the use of R1,R2 type regnames for clarity. The Output file... This is the built program, but it's not in a format our emulator can run just yet! We convert the object file into an ELF:  Object file... This is the file we want to convert ELF Type... The ELF format we want to build Linker Script... This is the script defining the address of the data blocks The Output file... This is the ELF file, but we still need to convert it into a DOL Here is our linkerscript 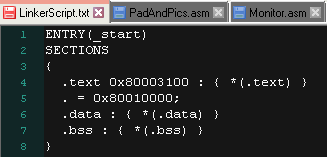 We use ELF2DOL to convert the file into a DOL for the emulator:  Source ELF... This is the file we want to convert Very Verbose!... We specify -v -v for detailed output info for debugging Output DOL... This is the finished gamecube executable |
|
| Our program is done, so we launch it from the command line with our emulator SuperGCube_0.4a_rev_0110_win32 |  |
| Here is the result | |
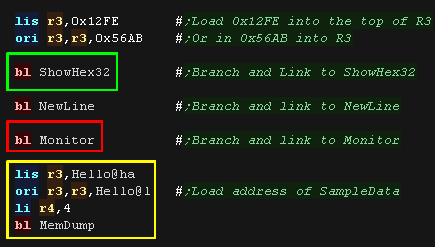
| In these tutorials we use some software debugging tools, A Monitor which shows the state of the registers, a Mem Dump which shows some lines of the memory We can also show a single hex value |
 |
| Here is the result | 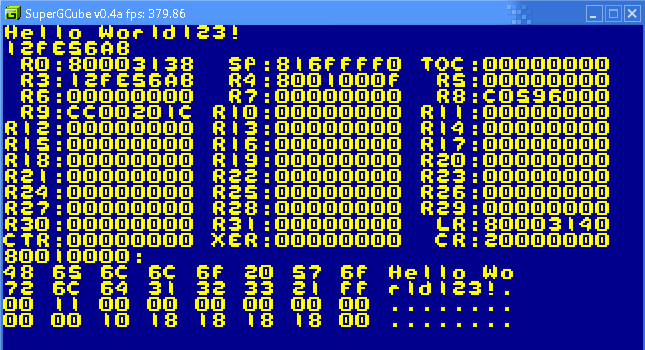 |
| The monitor functions need a newline command. It sets Y=Y+1, X=0 We need to include the monitor tools as a separate file. |
 |
| Writing
your own monitor tools may seem a bit odd, but writing our own
means we don't have to worry about the functionality our
emulator does or does not provide. The Monitor tools are pretty complex, so we're not going to discuss their workings here! |
 |