| We're gong to show a simple hello world message to the screen! | 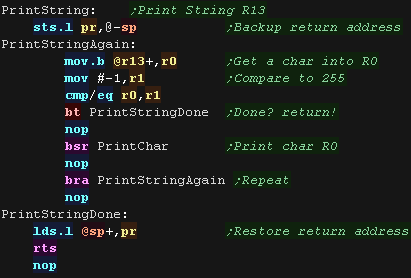 |
| Our BIN program needs to start at address $6004000, we do this with an ORG statement. |  |
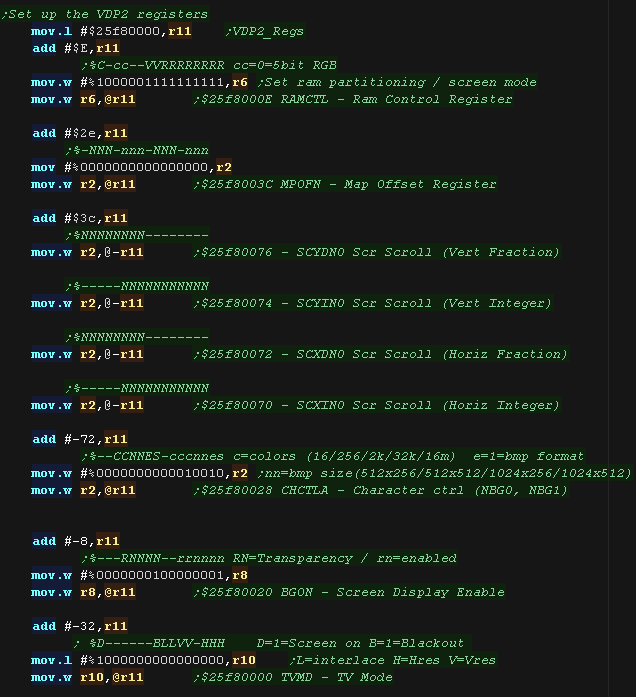
| Next we need to set up a valid screen. We need to set various registers on VDP2 (the video device for the bitmap screen). Shown here are sample values which will work on our emulator We need to set up the Ram layout and screen mode. We set up the scroll postition and map offset. We set up the bitmap screen size. Finally we enable the layer and turn on the screen |
 |
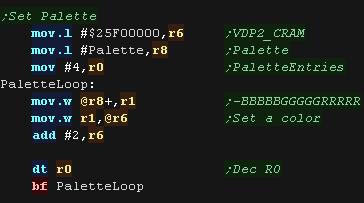
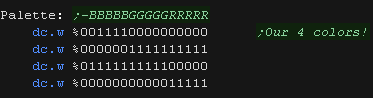
| Our screen is on, but we've not set up any colors! The color ram is at address $25F00000, The screen is set up to use 5 bits per channel in the format %-BBBBBGGGGGRRRRR We transfer each of the 4 colors to CRAM to set up our color screen |
  |
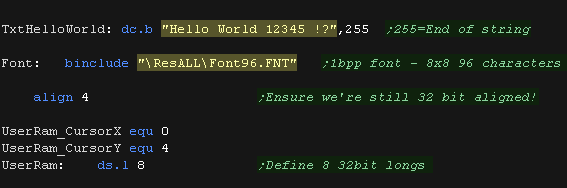
| Before we can show anything we need to define some data in
memory. We need some text to show. We need some bitmap data for our font. The file here is 1 bit per pixel 8x8 (so 8 bytes per char) We also need to remember the 'Cursor Position' (the next place to draw a character. This is stored in a few bytes of memory we define as 'UserRam' |
 |
| Before we try to print anything we need to ensure our cursor is reset to pos 0,0 | 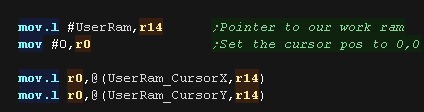 |
| Our PrintString routine will print a Char 255 terminated string
to the screen. We load the address of the string in R13 After we're done, we drop into an infinite loop |
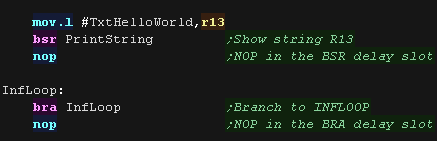 |
| Our print string routine loads a byte into R0, it compares this character to 255, when -1 (255) is found, the string has ended and we return. Otherwise we print the character to the screen with the PrintChar routine |
|
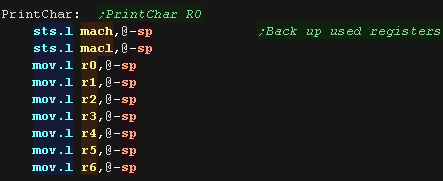
| Most of the difficulty is
printing a character! First we back up all the registers we will use onto the stack |
 |
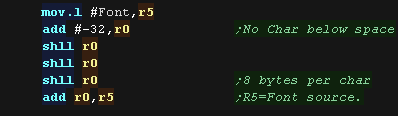
| Next we calculate the offset in our bitmap font for the
character in R0 Our font has no character below 32 (space) Each character uses 8 bytes (one byte per 8 pixel line) |
 |
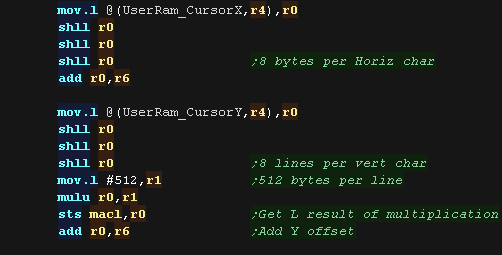
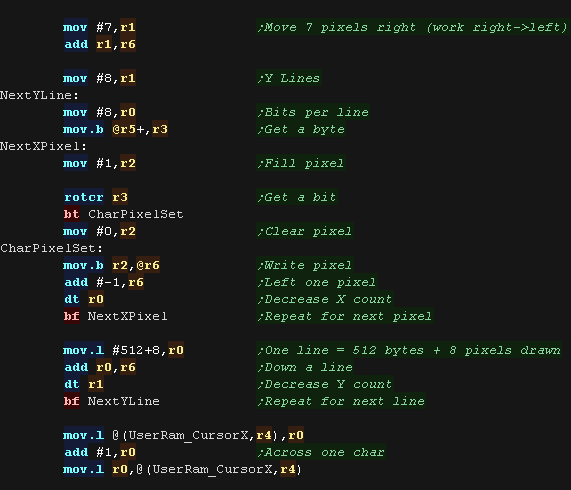
| We need to calculate the VRAM destination for our drawing While not all are visible, Our screen is 512 bytes wide, each pixel is 1 byte The screen base is $25e00000 So our formula is: VRAM= $25e00000 + Ypos*512 + Xpos However our Cursor Xpos and Ypos are measured in characters, so we multiply them by 8 via 3 shifts first. |
 |
| one screen byte is a pixel... but in our font one bit is a
pixel! We shift bits out of the right of our source byte, so we
work right to left on our screen. To do this we add 7 to our Vram destination, to move to the rightmost pixel of the line. We load a byte from our font into R3, We shift bits our R3, test them and write the correct color (1 or 0) to the screen in R6. After a line, we move down the screen by adding 512 (+8 to compensate for the moves) We repeat until our character is drawn |
 |
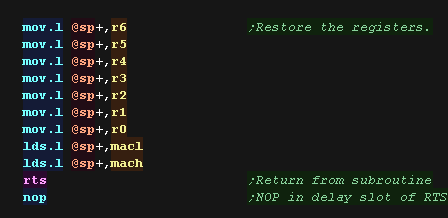
| We're done! so we restore all the registers from the stack. |
 |
| these tutorials use ASW
as an assembler, it's free and open source! We assemble it on the command line with the following command:  ASM Source file... %BuildFile% is the source file in this example it's a batch variable, but you may just want SAT_HelloWorld.asm here. Cpu Type... We specify the SH7600 , another name for the SH2! Listing file... You don't need one, but a listing file shows what the assembler did, and can help with debugging. Defined Symbol... I'm defining 'BuildSat' on the command line, my code uses this with conditional assembly to allow the multiplatform examples to run on multiple systems. The Output file... This is the built program, but it's not in a format our emulator can run just yet! We use P2BIN to convert the intermediate file (Prog.bld) into the finished binary file (Prog.bin)  |
|
| Our program is done, so we launh it from the command line with our emulator Yabause |  |
| Here is the result | |
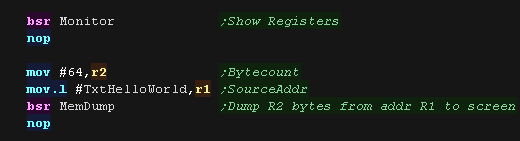
| In these tutorials we use some software debugging tools, A Monitor which shows the state of the registers, a Mem Dump which shows some lines of the memory |
 |
| Here is the result | 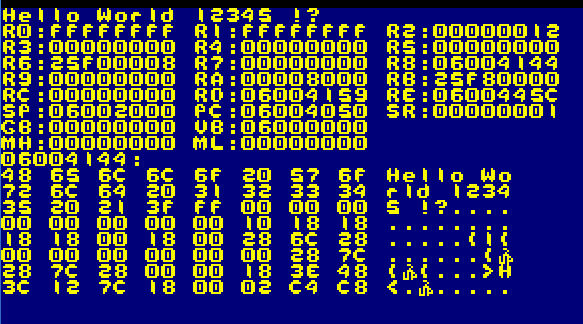 |
| The monitor functions need a newline command. It sets Y=Y+1, X=0 |
|
| The monitor uses a PUSHALL and POPALL macro to easily back up
and restore registers. These are defined in a separate asm file. |
 |
| We need to include the monitor tools as a separate file. |  |
| Writing
your own monitor tools may seem a bit odd, but writing our own
means we don't have to worry about the functionality our
emulator does or does not provide. The Monitor tools are pretty complex, so we're not going to discuss their workings here! |
 |
| Normally
in these Hello World tutorials we would have a single ASM file,
but this time we need two because of how the 32x works. The first is a Megadrive/Genesis 68000 'boot strap' which starts up the system, before starting up the 32x part. We'll assemble the genesis 68000 part with VASM We'll assemble the 32x part with ASW |
 |
The Genesis bootstrap
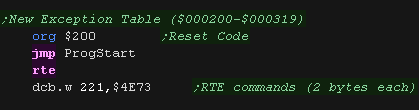
| At the start of the 68000 memory map is the 'exception table',
however on the 32x, this is moved to $00000200 The old table is filled with branches to the 32x startup routine are $000003F0 |
 |
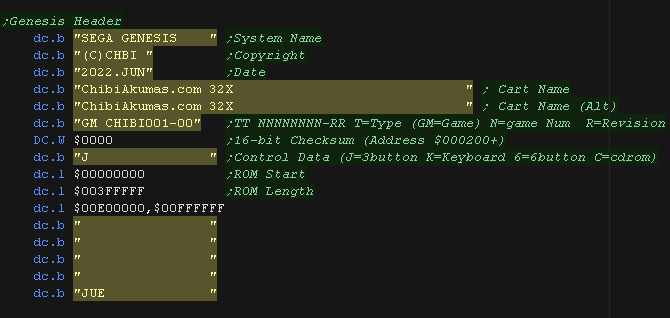
| Next we have our cartridge header, this just contains the
description of our cartridge, and a few other bits. |
 |
| The exception table is now at address $00000200 We only need the reset address, which points to the program code for the 68000 Genesis processor |
 |
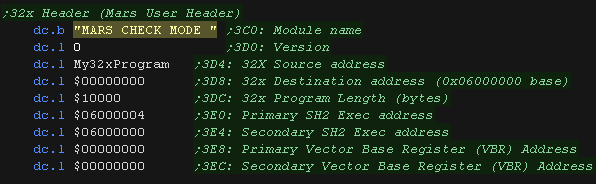
| We now have the 32x header. Address $000003D4 has the address of the 32x program code in the genesis cartridge This will be copied to the 32x memory $3E0 and $3E4 have the execution address of the 32x code for the two SH2 processors. These should be at address $06000000+ |
 |
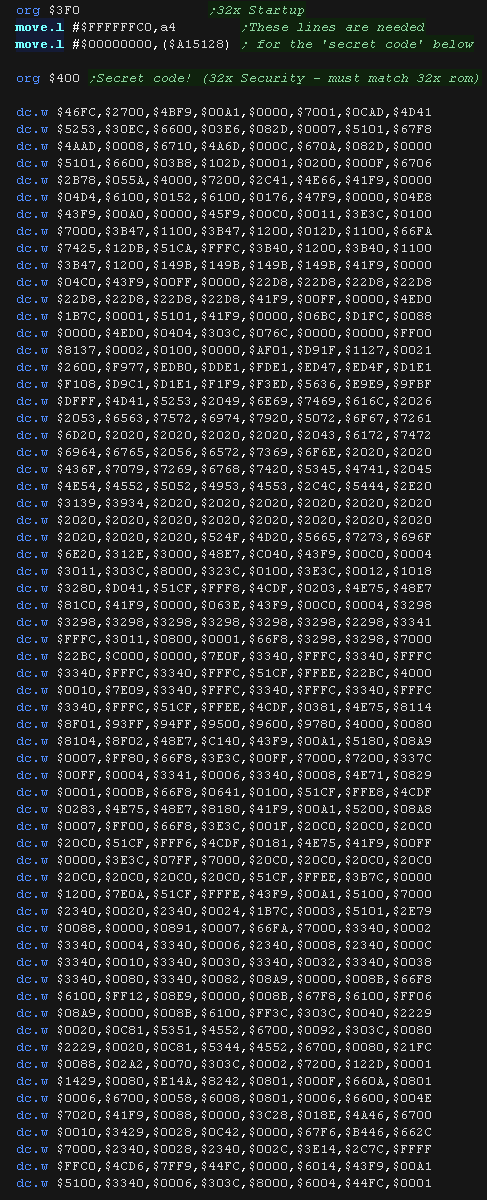
| At address $3F0+ we have the 32x startup code. As a security feature, Much of this has to byte match the same code in the 32x rom, so is included as binary data. |
 |
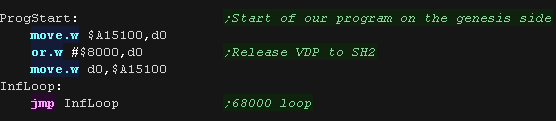
| Our Geneisis 68000 program is very basic, we release the video
hardware to the SH2, and drop into an infinate loop |
 |
| In the rom file, After our 68000 code we will 'attach' the
assembled 32x binary. We do this 'combining' with a batch file. |
 |
 |
This is a 'bare minimum' 68000 program,
Actually we'll probably want more, as to access the Joypads and
all of the sound hardware we have use code on the Genesis! We'll cover that kind of thing in the 'Simple series' |
The 32x bootstrap!
| When it's loaded into the 32x memory, our SH2 program will start
at address $06000000 We specified the secondary SH2 would start executing this address... we don't actually plan to use that CPU, so we lock it into an infinite loop. |
 |
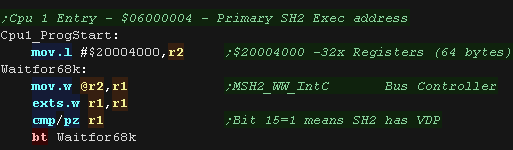
| CPU 1's entry point was defined as $06000004 in the 32x header. First we wait for the 68000 to release the VDP |
 |
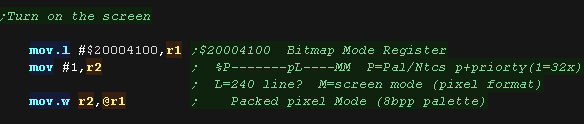
| We use the Bitmap Mode Register $20004100 to turn on the screen. Here we select a 256 color screen mode. |
 |
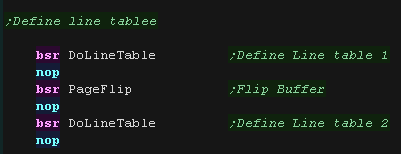
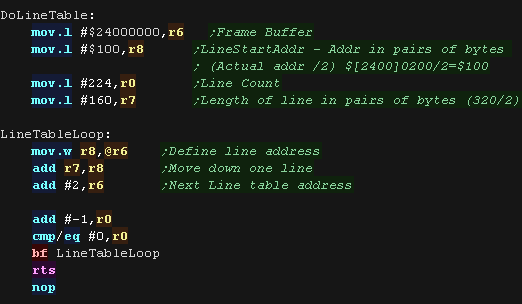
| The SH2 screen memory needs to start with a 'Line Table' This defines the memory addresses that are used for each line of the screen. We do this twice, once for each screen buffer. We'll take a look at this in a moment! |
 |
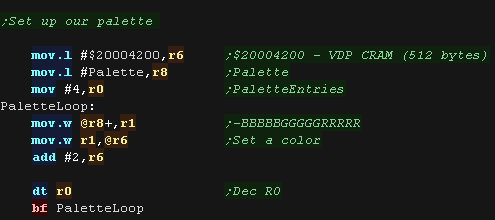
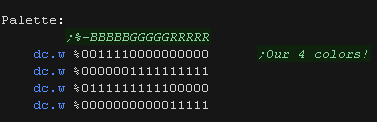
| Our screen is nearly ready, it's on, but we need to set up it's
colors. Each color is defined by 16 bits, from address $20004200 - The bits are in the format %-BBBBBGGGGGRRRRR |
  |
Graphics routines.
| The Line table starts at
$24000000, each entry is one word - 224 line entries in total , and
contains the offset IN WORDS for the bitmap data of that line. Effectively we write $100+(Line*160) repeating for 224 lines. |
 |
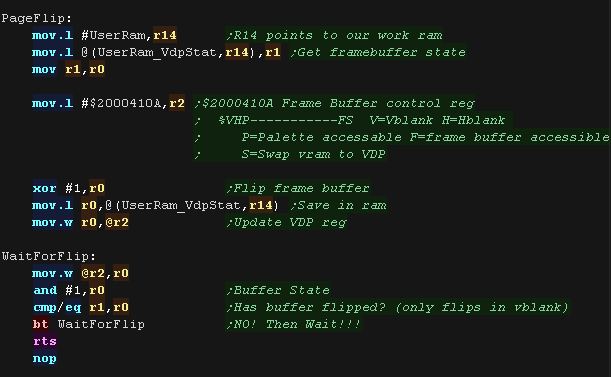
| To force a page flip, we need to flip bit 0 of $2000410A. This transfers the buffer fat address $24000000 into VRAM. But there's a catch! the flip won't actually occur until VBLANK, so once we attempt the flip, we wait until it actually occurs by waiting for the read back bit to match the one we wrote. |
 |
| Before we can show anything we need to define some data in
memory. We need some text to show. We need some bitmap data for our font. The file here is 1 bit per pixel 8x8 (so 8 bytes per char) We also need to remember the 'Cursor Position' (the next place to draw a character. This is stored in a few bytes of memory we define as 'UserRam' |
|
| Before we try to print anything we need to ensure our cursor is reset to pos 0,0 | |
| Our PrintString routine will print a Char 255 terminated string
to the screen. We load the address of the string in R13 On the 32x we have to send the VRAM buffer to the VDP via our 'Pageflip' command After we're done, we drop into an infinite loop |
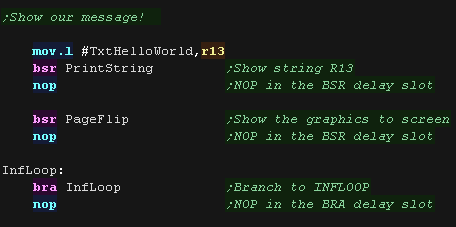 |
| Our print string routine loads a byte into R0, it compares this character to 255, when -1 (255) is found, the string has ended and we return. Otherwise we print the character to the screen with the PrintChar routine |
|
| Most of the difficulty is
printing a character! First we back up all the registers we will use onto the stack |
|
| Next we calculate the offset in our bitmap font for the
character in R0 Our font has no character below 32 (space) Each character uses 8 bytes (one byte per 8 pixel line) |
|
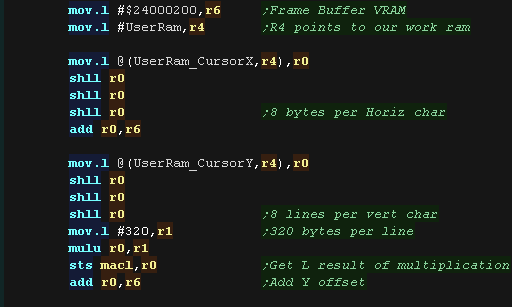
| We need to calculate the VRAM destination for our drawing While not all are visible, Our screen is 320 bytes wide, each pixel is 1 byte The screen base is $24000200 So our formula is: VRAM= $24000200 + Ypos*320 + Xpos However our Cursor Xpos and Ypos are measured in characters, so we multiply them by 8 via 3 shifts first. |
 |
| one screen byte is a pixel... but in our font one bit is a
pixel! We shift bits out of the right of our source byte, so we
work right to left on our screen. To do this we add 7 to our Vram destination, to move to the rightmost pixel of the line. We load a byte from our font into R3, We shift bits our R3, test them and write the correct color (1 or 0) to the screen in R6. After a line, we move down the screen by adding 320 (+8 to compensate for the moves) We repeat until our character is drawn |
 |
| We're done! so we restore all the registers from the stack. |
|
| these tutorials use ASW
as an SH2 assembler, and VASM
for 68000 , both are free and open source! We assemble the 68000 part on the command line with the following command:  ASM Source file... %BuildFile% is the source file in this example it's a batch variable, but you may just want MDHeader_Min.asm here. Listing file... You don't need one, but a listing file shows what the assembler did, and can help with debugging. Checking options... We disable case sensitivity, and ask the assembler to check if labels look like commands (if we forget a tab on our command) Defined Symbol... I'm defining 'BuildGen' and 'Vasm' on the command line, my code uses this with conditional assembly to allow the multiplatform examples to run on multiple systems. The Output file... This is the built program, It's a binary, but we need the SH2 part too! We assemble the SH2 part on the command line with the following command:  ASM Source file... %BuildFile% is the source file in this example it's a batch variable, but you may just want 32x_HelloWorld.asm here. Cpu Type... We specify the SH7600 , another name for the SH2! Listing file... You don't need one, but a listing file shows what the assembler did, and can help with debugging. Defined Symbol... I'm defining 'BuildSat' on the command line, my code uses this with conditional assembly to allow the multiplatform examples to run on multiple systems. The Output file... This is the built program, but it's not in a format our emulator can run just yet! We use P2BIN to convert the intermediate SH2 file (Prog.bld) into the finished binary file (Prog.bin) We then use Copy /B (Copy Binary) To attach the 32x part to the SH2 part  |
|
| Our program is done, so we launh it from the command line with our emulator Yabause |  |
| Here is the result | 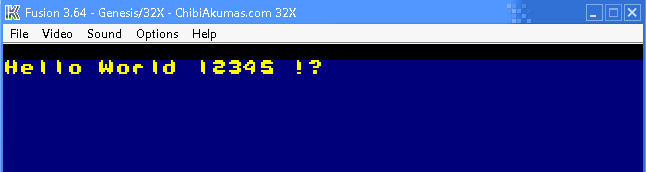 |
| In these tutorials we use some software debugging tools, A Monitor which shows the state of the registers, a Mem Dump which shows some lines of the memory |
|
| Here is the result | 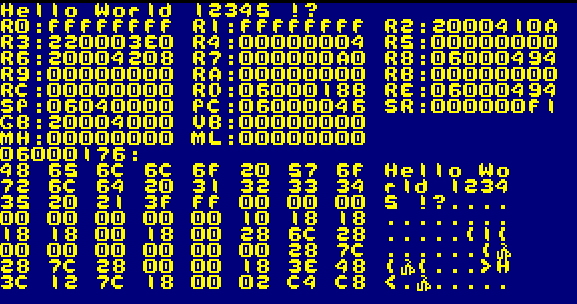 |
| The monitor functions need a newline command. It sets Y=Y+1, X=0 |
|
| The monitor uses a PUSHALL and POPALL macro to easily back up
and restore registers. These are defined in a separate asm file. |
|
| We need to include the monitor tools as a separate file. | |
| Writing
your own monitor tools may seem a bit odd, but writing our own
means we don't have to worry about the functionality our
emulator does or does not provide. The Monitor tools are pretty complex, so we're not going to discuss their workings here! |
|