
Lets create a basic N64 ROM cartridge, and run it on our Emulator!

N64_Hello.asm

Hello World Series
In this series we'll take a look at a minimal 'Hello World' example |
Lesson
H1 - Hello World on the N64 Lets create a basic N64 ROM cartridge, and run it on our Emulator! |
|
N64_Hello.asm |
|
A minimal 'Hello World'
| We're going to create a basic Hello World example, with it's own font! |  |
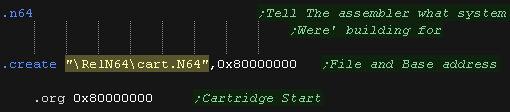
| Ok, Lets start our program. First we tell our assembler (ArMips) we're compiling for the N64, we are going to save to "\RelN64\cart.N64", and our cartridge needs to start at memory address 0x80000000 |
 |
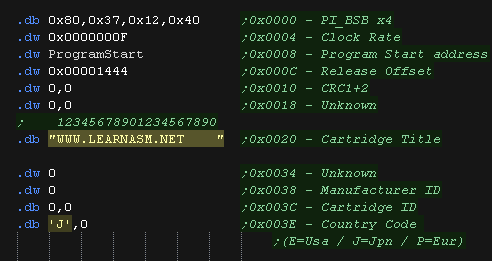
| We need to define a header for our cartridge. This has things like our program name, country and other useful factoids. It also contains a CRC (calculated Checksum) which needs to be correct, but we'll fix that with 'rn64crc' later. |
|
| We need a 'bootstrap' to start up the n64. We have two options... 1.Code up 1000 lines of code - or 2. patch in a Binary file we 'borrowed' to do the job. We'll use option 2 - actually many commercial games use the exact same bootstrap! |
 |
| We want to pad our cartridge to 8Mb, so we add a 'footer' to do this | 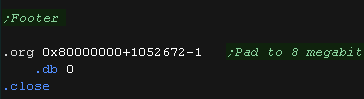 |
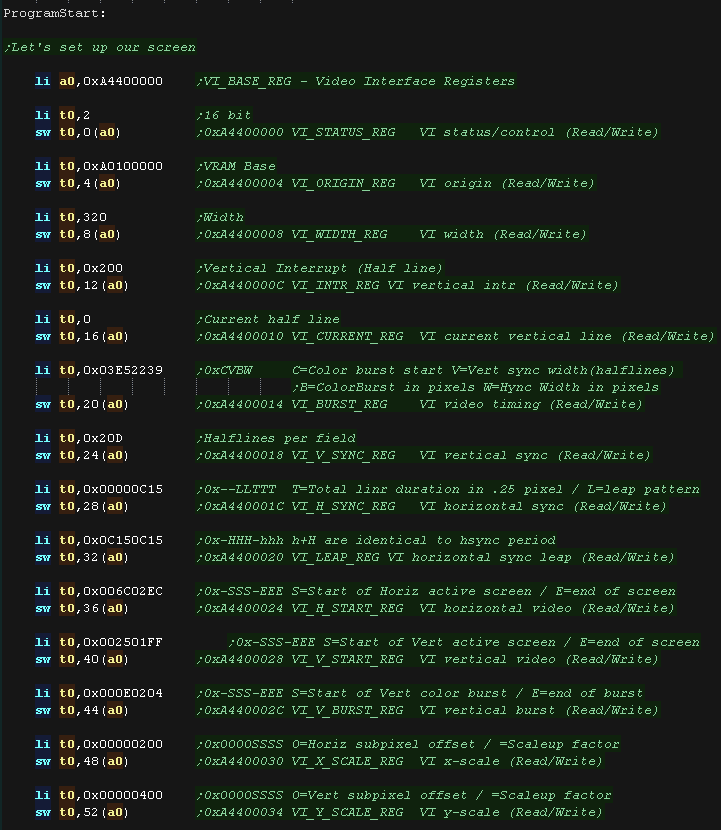
| OK! We need to set up our screen! Our screen will be 320x240 - 16 bpp (32,768 colors) it will start from memory address 0xA0100000 The video registers start from address 0xA4400000 - the values shown here will set up the screen. |
 |
| OK, next we need to define some variables We need some RAM for our program... 0xA0000000+ is RAM, so we 'll use 0xA0010000+ for our variables. Right now we only need two, an X,Y position for the next character to be drawn to the screen |
 |
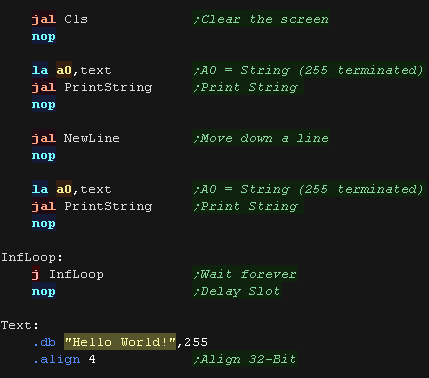
| Ok, Now for our little program! First we'll clear the screen, Then we'll print our 'Hello World' message to the screen We'll move down a line We'll show 'Hello World' again. Then we'll stop - ending with an infinite loop |
 |
| Here is what our test program does! | |
Clearing the screen
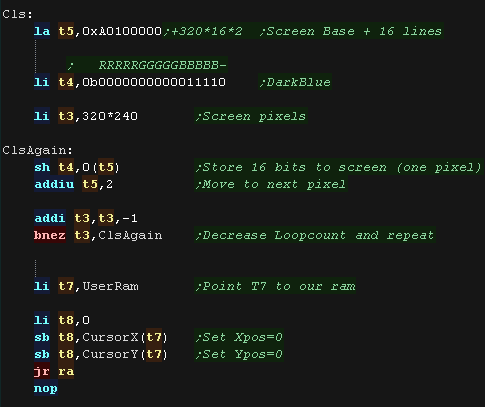
| Ok, Lets clear the screen
with a nice blue color! Our VRAM starts at 0xA0100000 , and each pixel is one Half (two bytes)... the total screen size is 320*240 pixels Our colors are defined by 5 bits per channel in the format %RRRRRGGGGGBBBBB- We write our color to all the pixels. Once we're done we zero our cursor X,Y position, so the next character draw appears in the top left. |
 |
 |
RAM
on the N64 is in BIG ENDIAN format! Meaning that the Half 0x1234
would be stored as 0x12 0x34 in memory. That doesn't affect this example, but if you were sending bitmap data to the screen from a file, you may need to adjust the order of your byte data. |
PrintString and NewLine
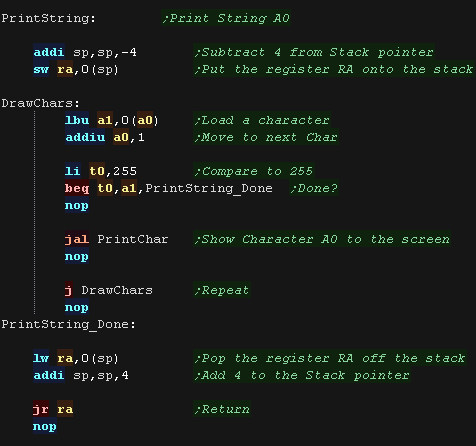
| When we want to print a string, we load it's address in A9. We load unsigned bytes from it's address - these are the Ascii characters we want to show. We use byte 255 termination in these tutorials to mark the end of our string - all other characters we pass to PrintChar to show to the screen. |
 |
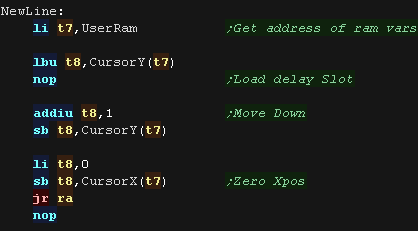
| Our NewLine routine is easy!... all we do is Zero the cursor Xpos,
and add 1 to the Cursor Ypos |
 |
PrintChar
| In our tutorials we use a 1bpp font (black and white) We'll convert this to 16bpp! |
 |
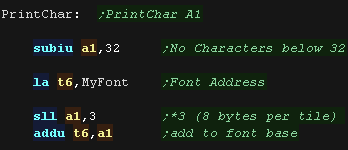
| Our font has no character <32, so first we subtract 32 from the
character number we want to show As each 8x8 pixel character is 8 bytes, We then multiply the Charnum by 8, and add to the Font base |
 |
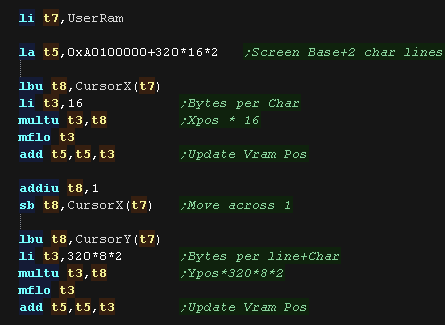
| We now need to caclulate our VRAM address Each char is 8 pixels wide, and each pixel is 2 bytes, so we multiply our Xpos by 16 Each char is 8 line tall, each line is 320 pixels, and each pixel is 2 bytes, so we multiply our Ypos by 320*8*2 Our VRAM base is 0xA0100000, but the first few lines are actually offscreen! |
 |
| Our source font uses a single byte for each line! Each bit in that line represents a pixel for the screen (one half) We use a different color for an 'on bit' (yellow) or an 'off bit' (blue) |
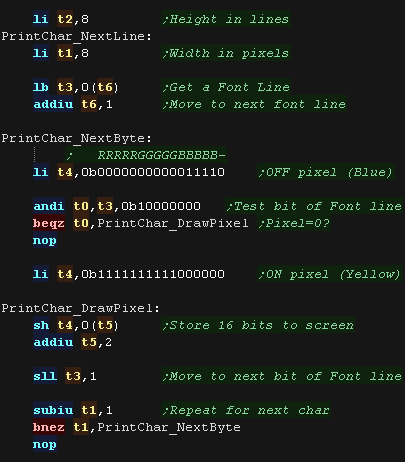 |
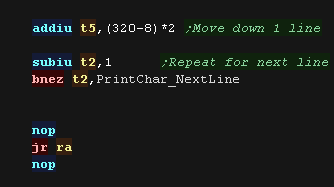
| After a line we add 320*2 (320 pixels * 2 bytes) to move
down a line. We repeat until our character is done. |
 |
Building and running our program
| We'll use the ArMips
assembler to build our program: \Utils\ArMips\armips.exe N64_Hello.asm -temp \BldN64\listing.txt -definelabel buildn64 1 N64_Hello.asm - this is the source file -temp \BldN64\listing.txt - this outputs a listing file... you don't need it, but it helps with debugging! -definelabel buildn64 1 - This defines a symbol 'buildn64'... you don't need this, but I use it to allow mips programs to assemble for both the N64 or PSX via conditional assembly |
| We generate a valid CRC checksum for our rom with rn64crc This will patch in a valid CRC into the rom file, allowing it to run. \Utils\rn64crc.exe -u \RelN64\cart.N64 |
| We start our rom with the Mupen64pp emulator mupen64pp.exe \RelN64\cart.N64 |
| If you want more,
check out "N64_Hello_Advanced.asm" It adds a software monitor and memdump, to allow you to see the contents of the registers and memory for your debugging pleasure! |
 |
 |
Lesson
H2 - Hello World on the Playstation 1 Lets create a basic PSX 'EXE' binary, and run it on our Emulator! |
|
PSX_HelloWorld.asm |
|
A minimal 'Hello World'
| We're going to create a basic Hello World example, with it's own font! |  |
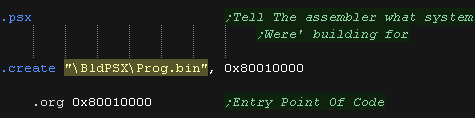
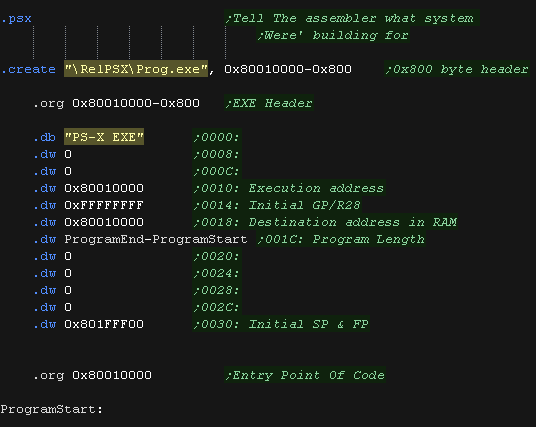
| Ok, Lets start our program. First we tell our assembler (ArMips) we're compiling for the PSX, we are going to save to "\BldPSX\Prog.bin", and our cartridge needs to start at memory address 0x80010000 |
 |
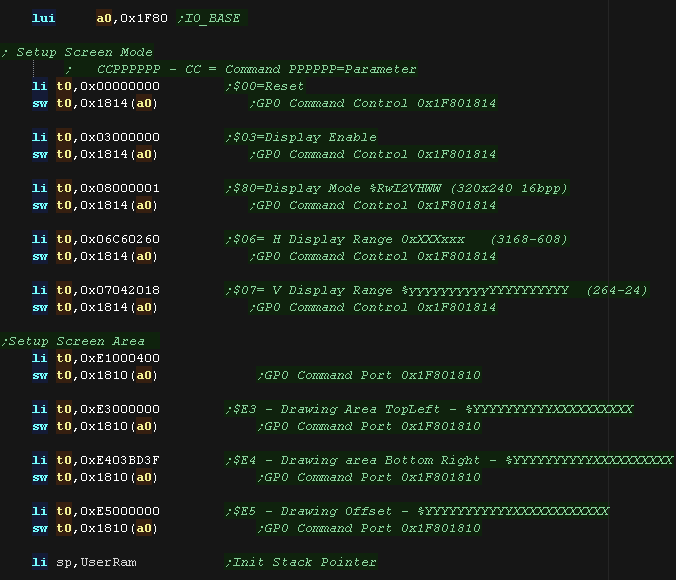
| We need to set up our screen. We use the IO registers from address 0x1F800000+ We set up a 320x240 16bpp screen |
 |
| Our 'Footer' just contains a close command |  |
| OK, next we need to define some variables We need some RAM for our program... 0x00020000+ is RAM, so we 'll use 0x00020000+ for our variables. Right now we only need two, an X,Y position for the next character to be drawn to the screen |
 |
| Ok, Now for our little program! First we'll clear the screen, Then we'll print our 'Hello World' message to the screen We'll move down a line We'll show 'Hello World' again. Then we'll stop - ending with an infinite loop |
|
| Here is what our test program does! | |
Clearing the screen
| Ok, Lets clear the screen
with a nice blue color! we need to command the GPU with port
0x1F801810 We use GFX command 0x2 to fill the screen. Our fill color is defined by 8 bits per channel in the format 0xBBGGRR The total screen size is 320*240 pixels, we define the fill area with the following 2 commands the GPU will then clear the screen for us. Once we're done we zero our cursor X,Y position, so the next character draw appears in the top left. |
|
|
We
can't actually write directly to the PSX screen - We have to use GFX commands. To draw our bitmap, we define a 'window', then stream the pixel bytes into that window |
PrintString and NewLine
| When we want to print a string, we load it's address in A9. We load unsigned bytes from it's address - these are the Ascii characters we want to show. We use byte 255 termination in these tutorials to mark the end of our string - all other characters we pass to PrintChar to show to the screen. |
|
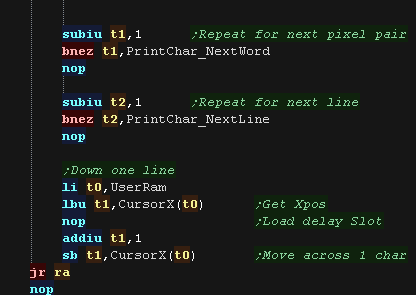
| Our NewLine routine is easy!... all we do is Zero the cursor Xpos,
and add 1 to the Cursor Ypos |
|
PrintChar
| In our tutorials we use a 1bpp font (black and white) We'll convert this to 16bpp! |
|
| Our font has no character <32, so first we subtract 32 from the
character number we want to show As each 8x8 pixel character is 8 bytes, We then multiply the Charnum by 8, and add to the Font base |
|
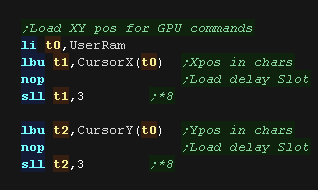
| We need to load in our XY position of our cursor. We load these in and convert them to a pixel address by multiplying by 8 |
 |
| We need to start the graphics command.- we define the XY pos of
our character, and it's size... Our size is always 8 bytes! |
 |
| OK... we need to send our byte data. Our source font uses a single
byte for each line! Each bit in that line represents a pixel for the screen (one half) We use a different color for an 'on bit' (yellow) or an 'off bit' (blue) Our screen uses 2 bytes per pixel, in the format %-BBBBBGGGGGRRRRR we send two pixels per 32 bit word |
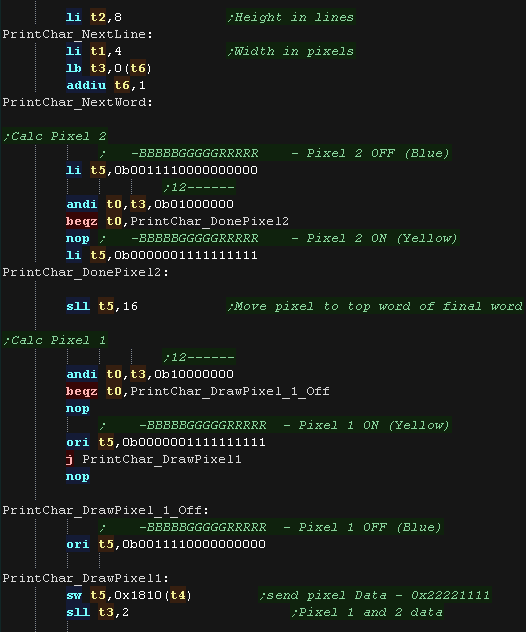 |
| We repeat for each of the 4 pixel pairs in the line. We've done one line, so We repeat until our character is done. after the character we move our Xpos across one line |
 |
Building and running our program
| We'll use the ArMips
assembler to build our program: \Utils\ArMips\armips.exe PSX_HelloWorld.asm -temp \BldPSX\listing.txt -definelabel buildpsx 1 PSX_HelloWorld.asm - this is the source file -temp \BldPSX\listing.txt - this outputs a listing file... you don't need it, but it helps with debugging! -definelabel buildpsx 1 - This defines a symbol 'buildpsx'... you don't need this, but I use it to allow mips programs to assemble for both the N64 or PSX via conditional assembly |
| We've created a BIN file, but this isn't executable by our
emulator. We use Bin2Exe.py
to convert the BIN to an EXE file \Utils\Bin2Exe\python \Utils\Bin2Exe\bin2exe.py "\BldPSX\Prog.bin" "\RelPSX\Prog.exe" |
| We start our exe with the no$psx
emulator \emu\no$psx\no$psx.exe "\RelPSX\Prog.exe" |
| If you want more,
check out "PSX_HelloWorld_Advanced.asm" It adds a software monitor and memdump, to allow you to see the contents of the registers and memory for your debugging pleasure! |
|
Making an EXE without Bin2EXE
| BIN2EXE doesn't really do much we can't do ourselves! We can define a valid EXE header with ASM commands. The 0x800 byte EXE header contains the length of the program, the load and execution address, and a few defaults for registers. |
 |
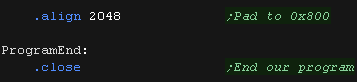
| At the end of our program we pad to a 2k boundary, and have a
label 'ProgramEnd' to allow us to calculate the program length. That's it! We no longer need Bin2EXE to make files for our emulator! |
 |