
| For RISC OS to run our program, it needs to start at memory
address 0x8000, we do this with an ORG statement. We need to set up a valid stack for our program, and allocate some space for it, We put this at the start of our program, and skip over the allocated space with a branch command. Our program will load the address of the Hello World string, and use our Printstring function to show it to the screen We return back to the OS with "SWI 0x11" - this takes an error code in R0 (We set it to zero) |
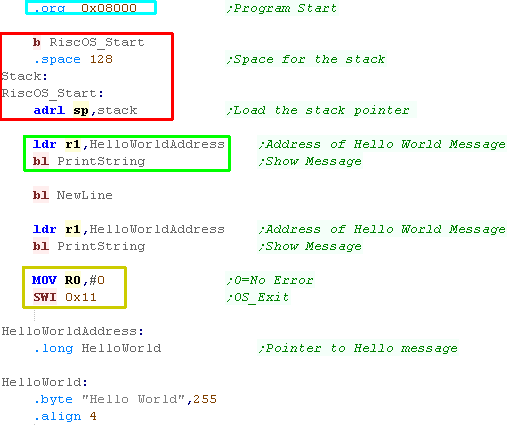 |
| When we want to print a character to the screen, we'll use SWI 0x0 (OS_WriteC). This will show the character into R0 to the screen. |  |
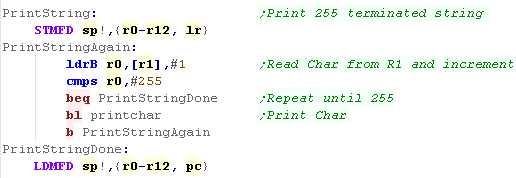
| We'll use this PrintChar routine to print a Char 255 terminated
string We'll create a function called 'PrintString' which will print the string at address [r1] |
 |
| When we want to start a new line, we use OS function SWI 0x03 (OS_NewLine) |  |
| these tutorials use VASM
as an assembler, it's free and open source! We compile it on the command line with the following command:  Defined Symbols... We're defining some symbols on the command line (equivalent of the equ command).. you don't need this for the basic hello world FBIN... Tell the assembler to output a binary file Listing File... we're specify a listing file - it shows the source and resulting bytecode, it's for debugging, so you don't need it, but it helps! Output file... this is the resulting program file, it needs a ,FF8 extension to be runnable by RISC OS (COMMA FFA) Source file... the ASM file we're compiling, in this example %buildFile% will be defined by the batchfile - it would be Hello.asm or something if you're writing your own build script a2... We're specifying to compile ARM2 CheckLabels,NoCase... We're disabling case sensitivity, we're also enabling 'Label Checking' - this will warn us if we've forgotton a tab, meaning or command is being treated as a label. OPT options... We're enabling a couple of assembler optimizations - these will automatically convert and break up our commands into multiple commands where a parameter is too large to load directly, The assembler will add ADD or SUB command to produce the value we wanted. |
|
| We need to transfer our program to the '\RPCEmu\hostfs' folder - this is treated as the disk drive by RPCEmu |  |
| We need to set up the run file "!Run,feb" (ExclaimationMark RUN COMMA FEB) in the !BOOT folder to start our program automatically |  |
| Here is the result | 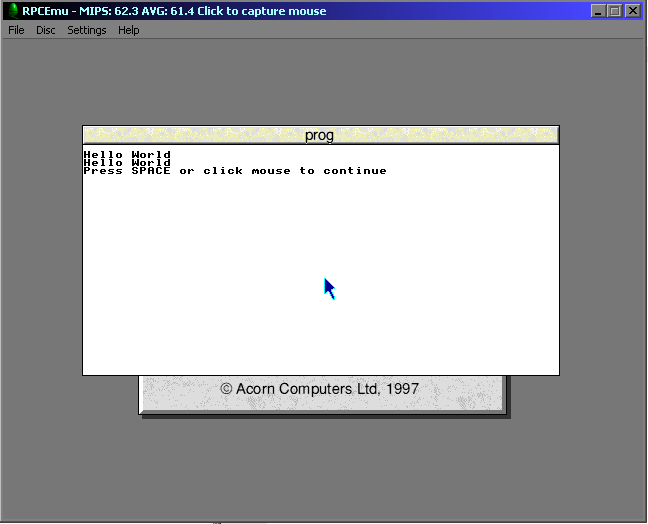 |
 |
Different
versions of RISC-OS will work differently with boot and
executables. This example was done with "riscos-3.71.rom" if
you're using a different ROM, you will probably need to do
things differently. |
| In these tutorials we use some software debugging tools, A Monitor which shows the state of the registers, a Mem Dump which shows some lines of the memory |
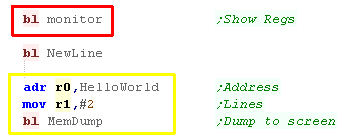 |
| Here is the result | 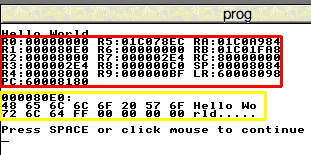 |
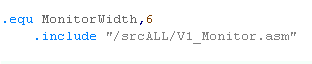
| We need to include the monitor tools as a separate file. We also define the width of the memdump - as smaller screen systems cannot output 8 chars per line. |
 |
| Writing
your own monitor tools may seem a bit odd, but writing our own
means we don't have to worry about the functionality our
emulator does or does not provide. The Monitor tools are pretty complex, so we're not going to discuss their workings here! |
 |
| We'll need to define an entire font for
todays example!... but don't worry, you can download the source
code for this example, and all the others from the link above an
to the right. This is nothing new, The source for every tutorial on the ChibiAkumas site should be in the respective sources.7z (if it's not, it's a mistake so let me know), but it seemed worth mentioning as people keep complaining about 'typing in code from screenshots' - so clearly not everyone realizes the source code is available. |
 |
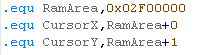
| First we're going to define some symbols. RAM on the GBA is at
memory address 0x02000000. We're going to need to define a couple of bytes of RAM to store the X and Y position the next character should be drawn (the 'Cursor' position) |
 |
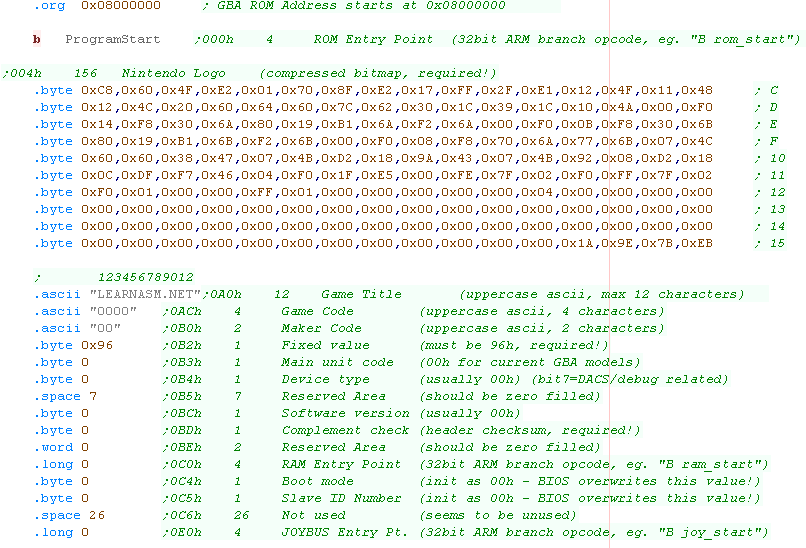
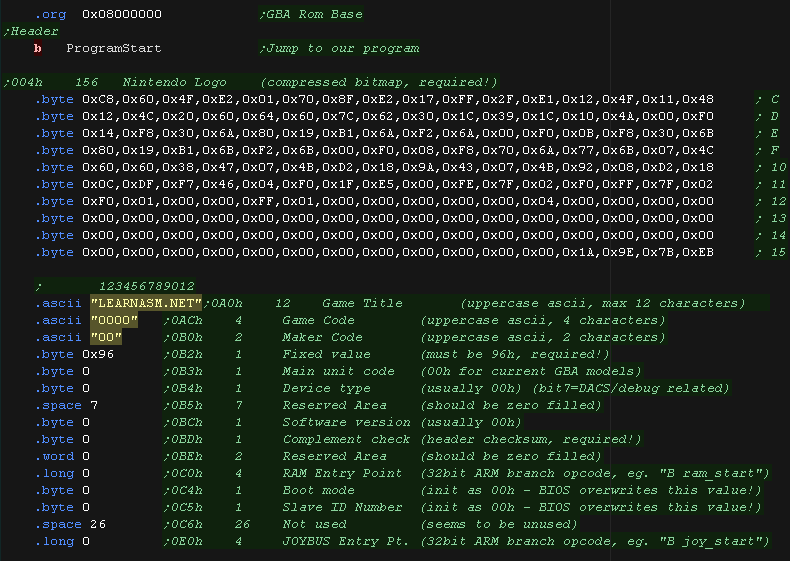
| Our ROM file needs to start at 0x08000000, Our rom starts with
a Branch to the main program. After that, We should have a 'generic header' to make the cartridge correct, though actually VisualBoyAdvance will work without any proper data here. |
 |
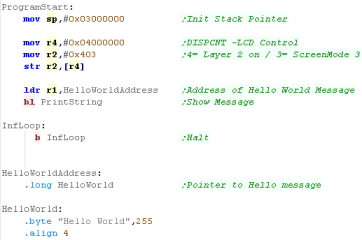
| When our program starts we need to set a valid stack pointer,
we point the stack pointer to the top of the RAM area. We're going to use a bitmap screen for our graphics, we turn this on by writing #0x403 to address 0x04000000 We're going to send the address of the Char 255 terminated 'Hello World' string to our PrintString subroutine. Because we have limited 32 bit loading options on the ARM, we store the address at 'HelloWorldAddress', and load the address into R1 with 'LDR' We then run our PrintString Subroutine |
 |
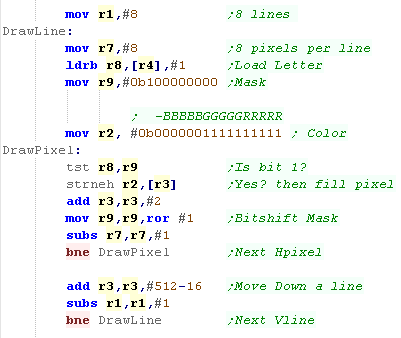
| We're going to need data for our font, we're using an 8x8 pixel font, 1 bit per pixel, so each character is 8 bytes. we're defining characters 32-128 of the ASCII character set. | 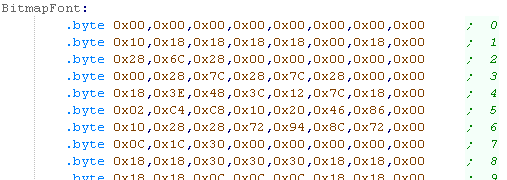 |
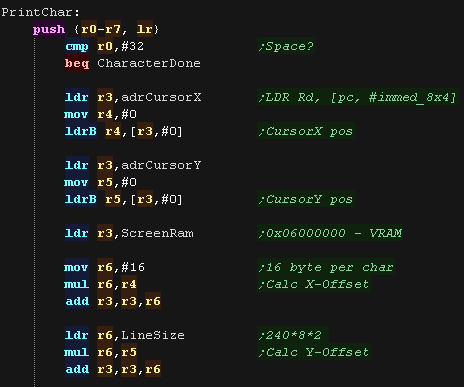
| We're going to show character R0 to the screen. Our Printchar routine needs to calculate the screen position in RAM, the screen base is 0x06000000. Each pixel is 2 bytes (in 0b-BBBBBGGGGGRRRRR format , 5 bits per color channel), and our character is 8 pixels wide so we multiply the Xpos by 8*2, Each line is 240 pixels, so we multiply out Ypos by 240*8*2 |
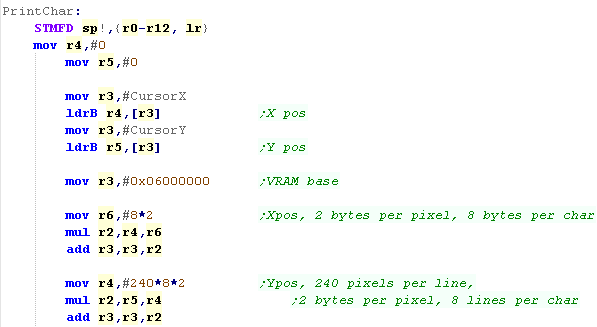 |
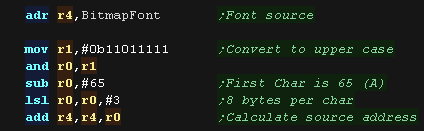
| Next we want to calculate the address of the character in our
font, We have no characters below 32, so we subtract 32 from the character we want to show Each character is 8 bytes, so we rotate the character number left 3 bits, multiplying it by 3, we add this to the 'BitmapFont' |
 |
| We're going to process each bit of the lines of the font, We shift bits out of the read in line, setting a pixel of the screen when the bit is 1. We repeat for all 8 lines, |
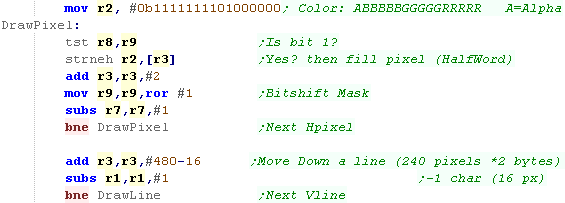 |
| After we've finished we increase our CursorX, so we're in the correct position for the next character. | 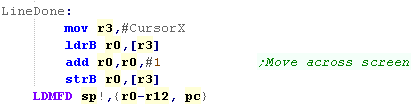 |
| these tutorials use VASM
as an assembler, it's free and open source! We compile it on the command line with the following command:  Defined Symbols... We're defining some symbols on the command line (equivalent of the equ command).. you don't need this for the basic hello world FBIN... Tell the assembler to output a binary file Listing File... we're specify a listing file - it shows the source and resulting bytecode, it's for debugging, so you don't need it, but it helps! Output file... this is the resulting ROM cartridge. Source file... the ASM file we're compiling, in this example %buildFile% will be defined by the batchfile - it would be Hello.asm or something if you're writing your own build script m7tdmi... We're specifying to compile ARM7tdmi code (The GBA CPU) CheckLabels,NoCase... We're disabling case sensitivity, we're also enabling 'Label Checking' - this will warn us if we've forgotton a tab, meaning or command is being treated as a label. |
|
| We can start our built cartridge from the command line |  |
| Alternatively we can load it from the file menu of our emulator | 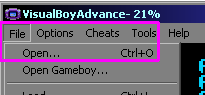 |
| Here is the result | 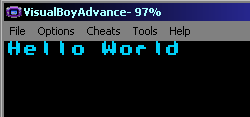 |
| In these tutorials we use some software debugging tools, A Monitor which shows the state of the registers, a Mem Dump which shows some lines of the memory |
|
| Here is the result | 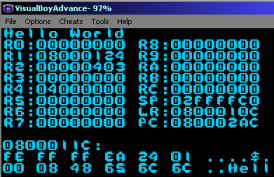 |
| We need to include the monitor tools as a separate file. We also define the width of the memdump - as smaller screen systems cannot output 8 chars per line. |
 |
| Writing
your own monitor tools may seem a bit odd, but writing our
own means we don't have to worry about the functionality our
emulator does or does not provide. The Monitor tools are pretty complex, so we're not going to discuss their workings here! |
|
| We'll need to define an entire font for
todays example!... but don't worry, you can download the
source code for this example, and all the others from the link
above an to the right. This is nothing new, The source for every tutorial on the ChibiAkumas site should be in the respective sources.7z (if it's not, it's a mistake so let me know), but it seemed worth mentioning as people keep complaining about 'typing in code from screenshots' - so clearly not everyone realizes the source code is available. |
|
| First we're going to define some symbols. Like the GBA RAM
on the DS is at memory address 0x02000000. We're going to need to define a couple of bytes of RAM to store the X and Y position the next character should be drawn (the 'Cursor' position) |
 |
| the NDS will copy our program to RAM (at an address we
specify - 0x02000000) But we need to create a header first, this specifies (among other things) the address and length of the programs for the Main CPU (ARM9 - our program) and Sub CPU (ARM7 - sound and touchscreen driver) as well as the RAM destination these should be copied to. We also define a dummy ARM7 program - as we don't need the SUB CPU |
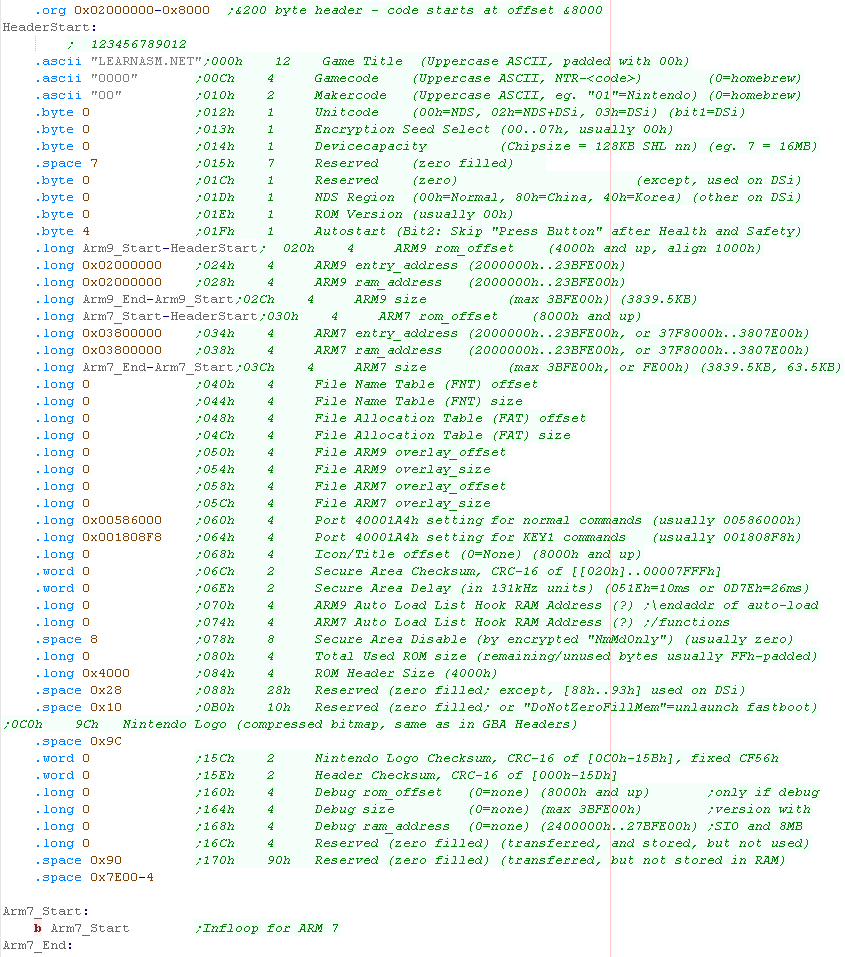 |
| When our program starts we need to set a valid stack
pointer, we point the stack pointer to the top of the RAM
area. First we need to enable the graphics hardware, we do this by writing 0x8003 to 0x4000304 Next we need to enable the bitmap graphics of Engine A (Engine B is less powerful)... we do this by writing 0x00020000 to 0x04000000 Finally we need to enable the VRAM by writing 0x80 to 0x4000240 |
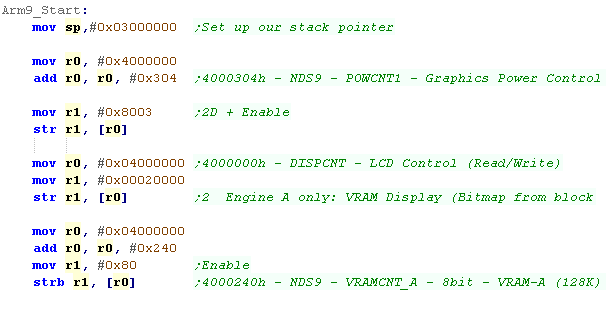 |
We're going to send the address of the Char 255 terminated 'Hello World' string to our PrintString subroutine. Because we have limited 32 bit loading options on the ARM, we store the address at 'HelloWorldAddress', and load the address into R1 with 'LDR' We then run our PrintString Subroutine |
 |
| We're going to need data for our font, we're using an 8x8 pixel font, 1 bit per pixel, so each character is 8 bytes. we're defining characters 32-128 of the ASCII character set. | |
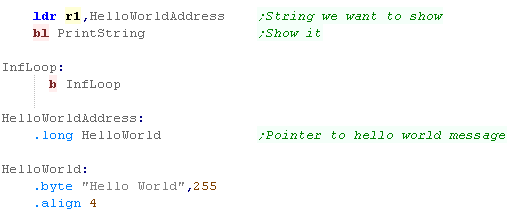
| We're going to show character R0 to the screen. Our Printchar routine needs to calculate the screen position in RAM, the screen base is 0x06800000. Each pixel is 2 bytes (in 0b-BBBBBGGGGGRRRRR format , 5 bits per color channel), and our character is 8 pixels wide so we multiply the Xpos by 8*2, Each line is 256 pixels, so we multiply out Ypos by 256*8*2 |
 |
| Next we want to calculate the address of the character in
our font, We have no characters below 32, so we subtract 32 from the character we want to show Each character is 8 bytes, so we rotate the character number left 3 bits, multiplying it by 3, we add this to the 'BitmapFont' |
|
| We're going to process each bit of the lines of the font, We shift bits out of the read in line, setting a pixel of the screen when the bit is 1. We repeat for all 8 lines, |
 |
| After we've finished we increase our CursorX, so we're in the correct position for the next character. | |
| these tutorials use VASM
as an assembler, it's free and open source! We compile it on the command line with the following command:  Defined Symbols... We're defining some symbols on the command line (equivalent of the equ command).. you don't need this for the basic hello world FBIN... Tell the assembler to output a binary file Listing File... we're specify a listing file - it shows the source and resulting bytecode, it's for debugging, so you don't need it, but it helps! Output file... this is the resulting ROM cartridge. Source file... the ASM file we're compiling, in this example %buildFile% will be defined by the batchfile - it would be Hello.asm or something if you're writing your own build script m7tdmi... We're specifying to compile ARM7tdmi code (The NDS CPU) CheckLabels,NoCase... We're disabling case sensitivity, we're also enabling 'Label Checking' - this will warn us if we've forgotton a tab, meaning or command is being treated as a label. |
|
| We can start our built cartridge from the command line |  |
| Alternatively we can load it from the file menu of our emulator |  |
| Here is the result | 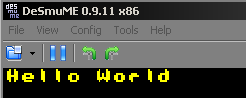 |
| In these tutorials we use some software debugging tools, A Monitor which shows the state of the registers, a Mem Dump which shows some lines of the memory |
|
| Here is the result | 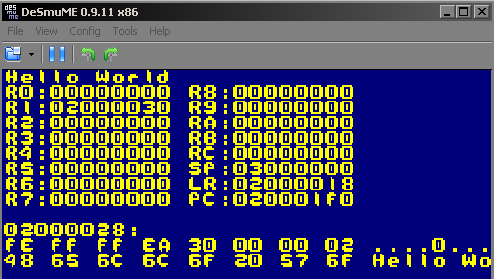 |
| We need to include the monitor tools as a separate file. We also define the width of the memdump - as smaller screen systems cannot output 8 chars per line. |
 |
| Writing
your own monitor tools may seem a bit odd, but writing our
own means we don't have to worry about the functionality
our emulator does or does not provide. The Monitor tools are pretty complex, so we're not going to discuss their workings here! |
|
 |
Lesson
H4 - Hello World on the GameBoy Advance with ARM Thumb Lets take a look at another minimal example, this time we'll show a Hello World Message using ARM THUMB code |
 |
 GBA_HelloThumb.asm |
 |
| We need a tiny bit of ARM code to get our program running in THUMB mode, it's impossible to start the arm straight in THUMB - oh well, it's not 100% Thumb, but whacha gonna do!? | |
| We use two variables, CursorX and CursorY, to track the position where the next character should be shown. These are defined in the RAM memory 0x02000000+ |  |
| Our ROM file needs to start at 0x08000000, Our rom starts
with a Branch to the main program. After that, We should have a 'generic header' to make the cartridge correct, though actually VisualBoyAdvance will work without any proper data here. |
 |
| When our program starts, it does so in ARM mode, so we first switch to THUMB with a BX command. | 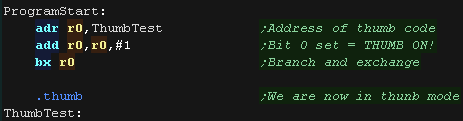 |
| Because of the THUMB limitations, we have to store our 32 bit values as data values, and load them into registers. | 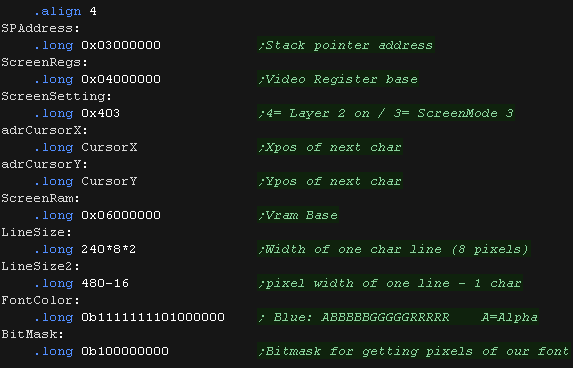 |
| At the start of our program we need to define a valid Stack Pointer (SP). We then turn on the graphics mode of our screen by writing 0x403 to address 0x04000000 . |  |
| We load our HelloWorld message into R1, and call our PrintString subroutine to show our message to the screen. |  |
| We read in a character from the string we want to show, then look up the matching character in our font. Register R1 points to the string, which should end with a character 255. | 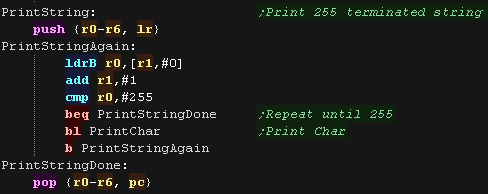 |
| The GBA does not have a firmware font, so we defined a 1 bit per pixel font (1 byte per line). We'll need to convert this to 16bpp for the GBA screen format. | 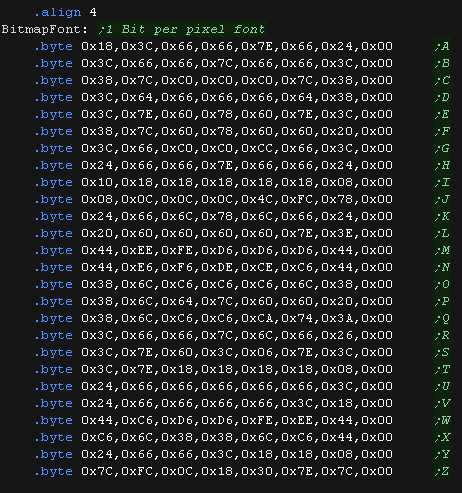 |
| The VRAM screen starts at 0x06000000, each pixel is 2
bytes. Our font is 8 pixels wide, so we multiply the CursorX position by 16. Each line of the screen is 240 pixels (480 bytes) and our font is 8 lines tall, so we multiply the CursorY position by 240*8*2. We add these to the screen base. We have now calculated our Screen Address for the character to be shown in R3. |
 |
| We need to convert the ASCII character to a character number
in our font. We also need to convert to uppercase. |
 |
| Depending on that bit, we set the matching pixel of the
screen with the font color, or just skip over that pixel
leaving it unchanged. We repeat until the line is done, then add #480-16 to the screen position (the length of one line minus the number of bytes in one character). We repeat this procedure until all 8 lines of the font are done, |
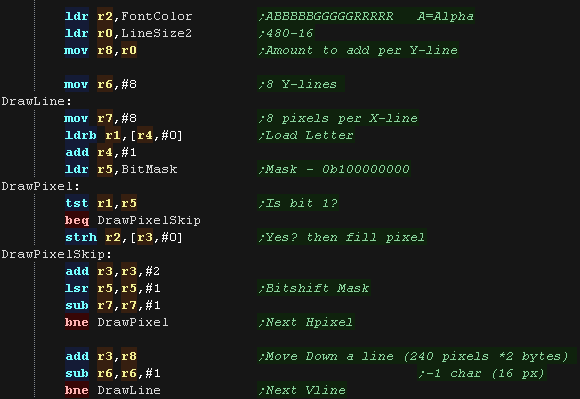 |
| After we've finished we increase our CursorX, so we're in the correct position for the next character. | 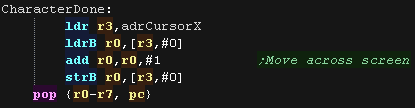 |
| these tutorials use VASM
as an assembler, it's free and open source! We compile it on the command line with the following command:
FBIN... Tell the assembler to output a binary file Listing File... we're specify a listing file - it shows the source and resulting bytecode, it's for debugging, so you don't need it, but it helps! Output file... this is the resulting ROM cartridge. Source file... the ASM file we're compiling, in this example %buildFile% will be defined by the batchfile - it would be Hello.asm or something if you're writing your own build script m7tdmi... We're specifying to compile ARM7tdmi code (The GBA CPU) NOIALIGN... We're telling the assembler not to align to 32 bit boundarys (THUMB is 16 bit) CheckLabels,NoCase... We're disabling case sensitivity, we're also enabling 'Label Checking' - this will warn us if we've forgotton a tab, meaning or command is being treated as a label. |
|
| We can start our built cartridge from the command line | |
| Alternatively we can load it from the file menu of our emulator | |
| Here is the result | |
 |
Unlike
most BASICs, BBC BASIC is CASE SENSITIVE, so you need to put all
the commands in CAPS! But the Assembler also seemed to have trouble with all uppercase labels, so we'll leave labels as lowercase |
| Our emulator is set to mount the folder "HostFS" as a drive on
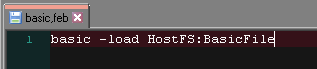
our RiscOS Machine Lets create a script file to start BASIC and load a text file as it's program. We call this file basic,feb (BASIC COMMA FEB) |
 |
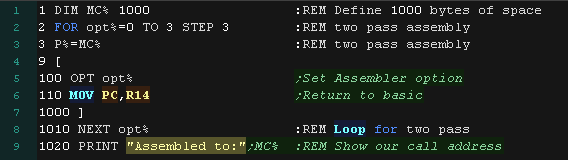
| Lets look at a simple wrapper for a minimal ASM program (It just
returns to basic!) :REM - A basic REM comment statement ;;- an Assembly comment statement (\ also works) [ ] - Start and end of the ASM block DIM MC% 100 - This Defines a block of 101 bytes from free memory and calls it MC% FOR opt%=0 TO 3 STEP 3 - This runs two passes of our assembly file, once with option 0 (No Errors shown) and once with option 3 (Errors shown + Listing) P%=MC% - This sets the program counter (P%) for the start of the pass OPT opt% - This is an assembler directive, and tells the assembler what OPTions to use for the pass We also had to replace TAB characters with SPACES, as the assembler doesn't like TABs |
 |
| if we start with our BASIC script, it will load the file "BasicFile" in automatically for us so we don't need to type anything into basic! | 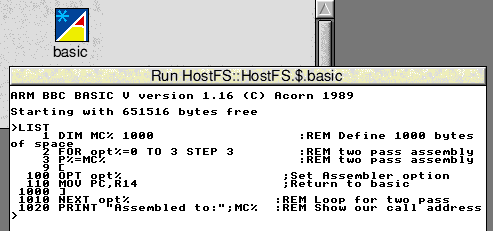 |
| To assemble our program we just use RUN We can start our program with CALL MC% , or by calling the address we assembled to (CALL 6681) |
 |
Showing Hello World to the screen
| We're going to convert our previous hello world example to BBC
BASIC format. The main changes are: Hexadecimal needs to be specified with & prefix Labels need to be prefixed with . (full stop) TABs needed to be replaced with spaces SP needs to be referred to as R13 LR needs to be referred to as R14 Bytes, Words and Longs need to be defined with EQU |
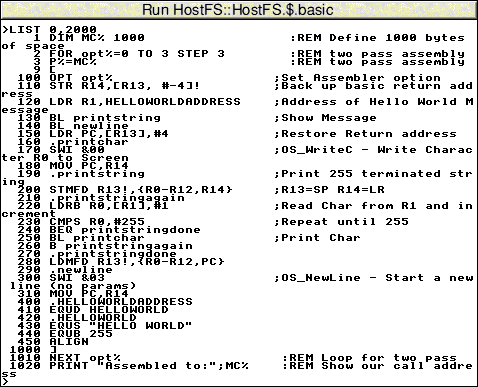 |
| When we want to print a character to the screen, we'll use SWI &00 (OS_WriteC). This will show the character into R0 to the screen. |  |
| We'll use this PrintChar routine to print a Char 255 terminated
string We'll create a function called 'PrintString' which will print the string at address [r1] |
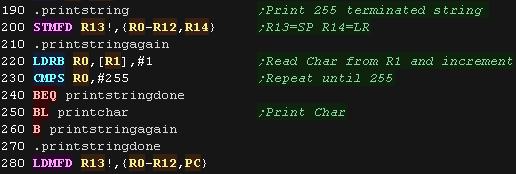 |
| When we want to start a new line, we use OS function SWI &03 (OS_NewLine) |  |
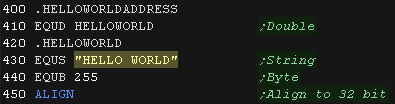
| We need to define our string! We define a string with EQUS, and a byte with EQUB We also define a 32 bit pointer to our string with EQUD (Double) We re-align to 32 bits with an ALIGN statement |
 |
| We push the return address R14 onto the stack We load the address of our string, and call our subroutine. We then return to the address on the stack to get back to basic. |
 |
| We start our program with CALL
MC% Our Hello World message will be shown to screen |
 |


