
 |
Lesson
H1 - Hello World on MS Dos In this lesson we'll learn to use DOS INTerrupt calls to show characters to the screen and return to DOS, we'll use this to show Hello World. |
 |
 |
 |
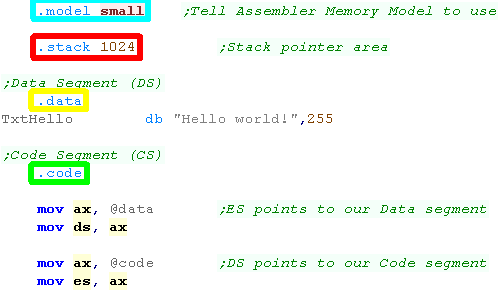
| First we're going to define our program type to the assembler
for a basic program .model small will work
well. Next we need to define a stack - we'll define 1024 bytes with .stack 1024 We'll define a data segment (DS) with .data... we'll put our 'Hello World' Message in there Next we need our .code segment... We'll start our program by initializing the DS and ES registers to the data segment and code segment |
 |
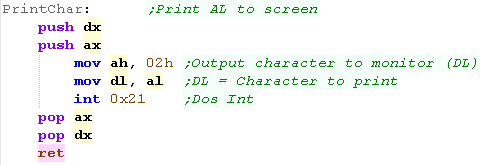
| When we want to print a character to the screen, we'll use INT
21h (dos int) function 02h (Output Character to Monitor) This prints the character in DL We'll write a function called PrintChar that prints the character in AL (this is to maintain compatibility with other platforms and tutorials) |
 |
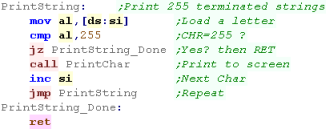
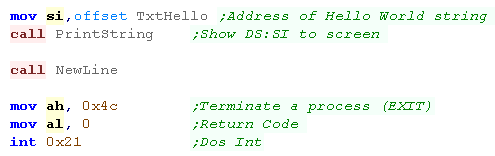
| We'll use this PrintChar routine to print a Char 255 terminated
string We'll create a function called 'PrintString' which will print the string at address [ds:si] |
 |
| When we want to start a new line, we can do this by printing Character 13, then Character 10 | 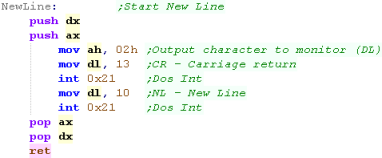 |
| When we want to show the string, we need to make sure ds:si
points to the 255 terminated string, To return to DOS we use INT 21h (Dos Int) function 4Ch - we can provide a return code to DO in AL |
 |
| these tutorials use UASM
as an assembler, it's free and MASM compatible! We compile it on the command line with the following command:  Defined Symbols... We're defining some symbols on the command line (equivalent of the equ command).. you don't need this for the basic hello world MZ = EXE... MZ tells the assembler we're buiding an EXE file (rather than a COM file) Listing File... we're specify a listing file - it shows the source and resulting bytecode, it's for debugging, so you don't need it, but it helps! Output file... this is the resulting program file Source file... the ASM file we're compiling, in this example %buildFile% will be defined by the batchfile - it would be Hello.asm or something if you're writing your own build script |
|
| The file will be built into a DOS EXE file... Note, this probably won't work on modern windows, so we'll run it with DOS BOX |
 |
| We need to set up the Dosbox config file (dosbox.conf) to autoload our program | 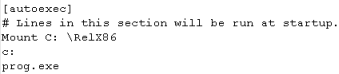 |
| Here is the result | 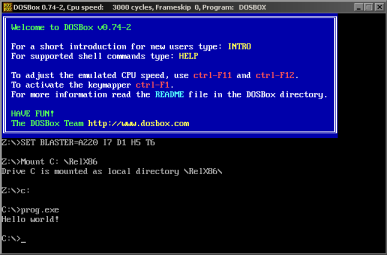 |
 |
COM
Files are limited to 64k in entirety - the .data and .code
segments must all fit in 64k EXE files are more flexible Due to the removal of backwards compatibility, neither will probably work on modern machines - at least if they are 64 bit. |
| In these tutorials we use some software debugging tools, A Monitor which shows the state of the registers, a Debugger which shows some lines of the memory |
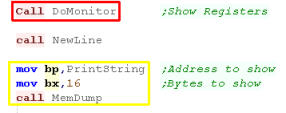 |
| Here is the result | 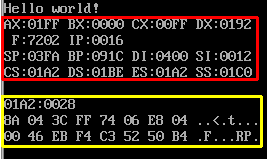 |
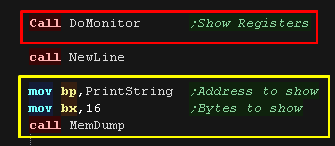
| The monitor tools need some words of data to back up essential registers, these should be defined in the DATA segment | 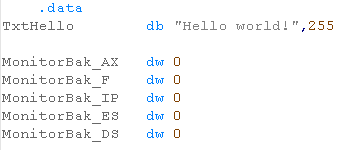 |
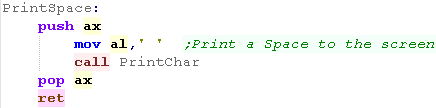
| The Monitor tools need a PrintSpace function | 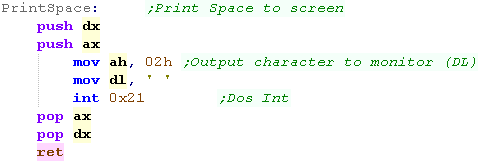 |
| We need to include the monitor tools as a separate file. | 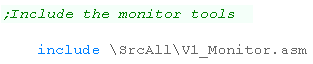 |
| Writing
your own monitor tools may seem a bit odd, but writing our own
means we don't have to worry about the functionality our
emulator does or does not provide. The Monitor tools are pretty complex, so we're not going to discuss their workings here! |
 |
  |
Lesson
H2 - Hello World on the WonderSwan / Wonderswan Color Let's take our 8086 on the road with some portable programming!... In this episode we'll take a look at the 186 based WonderSwan! |
|
|
|
| We need to start our program with a segment... We're
defining a segment called 'MainS'.... the end of our code
needs to end with 'mains ends' We're going to need some data in the RAM area... we'll define a base 'UserRam' and two bytes within this for the position of the next character (the cursor). Next we'll initialize the Stack pointer to memory address 8000h, and the stack segment to 0000h |
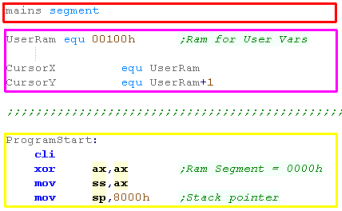 |
| At the bottom of the program we need a generic footer. | 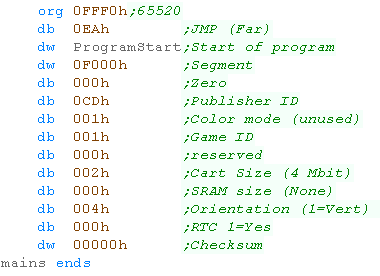 |
| Most
of the program is the same on both systems, but the screen
setup varies depending on which system you're interested in. |
|
| First we're going to turn off the screen layers - we do this
with port 00h |
 |
| Next we use port 60h to set the display mode We're using 'Planar mode' in these tutorials, so graphics are in Bitplanes. |
 |
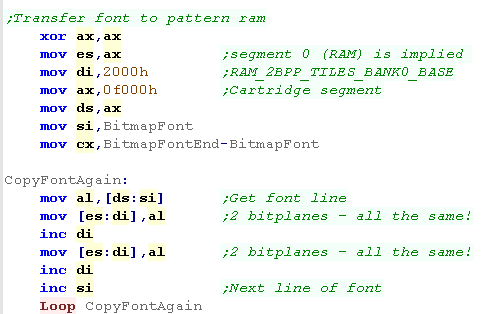
| We need to define our font! The file is 1 bit per pixel - 1
bit plane... but the wonderswan uses 2 bitplanes The Black and white tile patterns are at memory address 2000h onwards. We copy each byte of the font twice, filling both bitplanes, effectively setting the font to color 3. |
  |
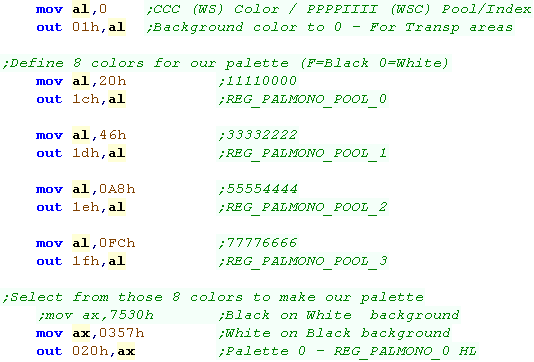
| On the black and white WonderSwan, we define a pool of 8
colors with ports 1Ch / 1Dh / 1Eh /1Fh... Each Byte contains 2 colors - as each nibble is one color We then select 4 of these colors for Palette 0 - which we'll use for the tiles with port 20h |
 |
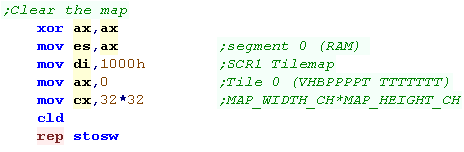
| OK, lets clear the tilemap! We needs to write 32 words to ram address 1000h... our tilemap is 32 * 32 |
 |
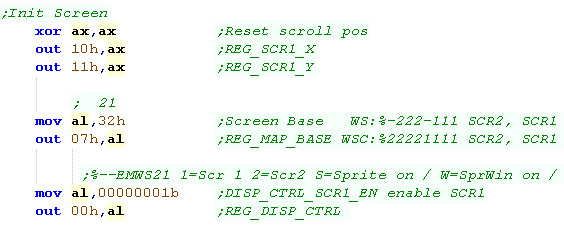
We need to set up our screen First we'll reset the tilemap position with port 10h,11h Next we define the memory address of the tilemaps with port 07h We'll enable the tilemap (SCR1) with port 00h |
 |
|
The
WonderSwan Color setup routine is almost the same... Lets
check it out |
| First we're going to turn off the screen layers - we do this
with port 00h |
|
| Next we use port 60h to set the display mode We're using 'Planar mode' in these tutorials, so graphics are in Bitplanes. |
|
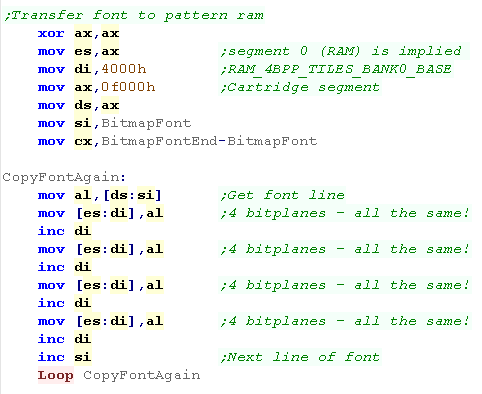
| We need to define our font! The file is 1 bit per pixel - 1
bit plane... but the wonderswan Color uses 4 bitplanes The Color tile patterns are at memory address 4000h onwards. We copy each byte of the font four times, filling all 4 bitplanes, effectively setting the font to color 15. |
 |
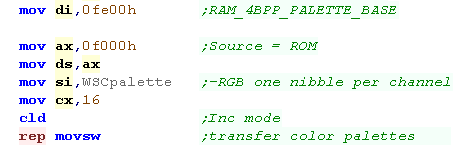
| When we want to define our palette on the WonderSwan color we
need to write words to address FE00h in ram onwards Each color takes two bytes in the format 0-RGBh - where each channel uses a nibble of the word and one nibble is unused |
  |
| OK, lets clear the tilemap! We needs to write 32 words to ram address 1000h... our tilemap is 32 * 32 |
|
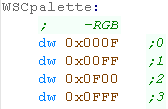
We need to set up our screen First we'll reset the tilemap position with port 10h,11h Next we define the memory address of the tilemaps with port 07h We'll enable the tilemap (SCR1) with port 00h Finally, on the WonderSwan Color, we'll enable High Contrast mode 14h (Though it may have no effect on the emulator?) |
 |
| We're done on the platform
specific code! The rest of our code will work on either the Wonderswan or Wonderswan color, awesome eh? |
 |
| When we want to print a character to the screen, we'll need to
set a tile of the screen We load in an X,Y position from CursorX and CursorY in ram, and convert this to a tile address. The Tilemap is stored at memory address 0000h and is 32x32 tiles in size. So our formula is: Tile Address = 1000h + (Ypos * 32 * 2) + (Xpos * 2) Each uses one word (Two Bytes) in the format: VHBPPPPT TTTTTTT V = V-flip H = H-flip B = wsc Bank P = Palette T = Tile After each print we move right one character, if we get to the end of a line, we need to start a new line. |
 |
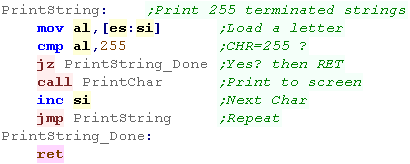
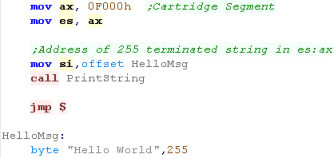
| We'll use this PrintChar routine to print a Char 255
terminated string We'll create a function called 'PrintString' which will print the string at address [es:si] |
 |
| When we move down a line, we zero the X-position, and increase the Y-position by one | 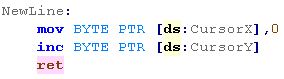 |
| When we want to show the string, we need to make sure es:si
points to the 255 terminated string, Once we're done, we lock into an infinite loop with Jmp $ ($ always points to the current line) |
 |
| these tutorials use UASM
as an assembler, it's free and MASM compatible! We compile it on the command line with the following command:  Defined Symbols... We're defining some symbols on the command line (equivalent of the equ command).. you don't need this for the basic hello world -bin... this tells the assembler we're building an raw binary file. -1... this tells the assembler to use 186 mode. Listing File... we're specify a listing file - it shows the source and resulting bytecode, it's for debugging, so you don't need it, but it helps! Output file... this is the resulting program file Source file... the ASM file we're compiling, in this example %buildFile% will be defined by the batchfile - it would be Hello.asm or something if you're writing your own build script |
|
| We've built a ROM file... we can start it on the command line
with oswan |
 |
| Here is the result | 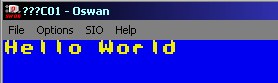 |
| In these tutorials we use some software debugging tools, A Monitor which shows the state of the registers, a Debugger which shows some lines of the memory |
|
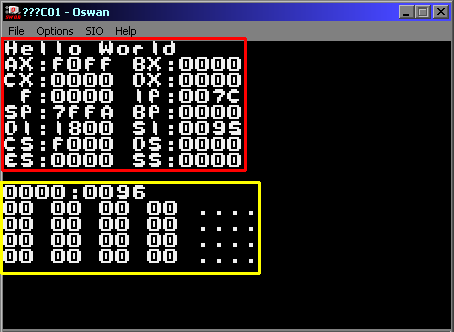
| Here is the result |
 |
| The monitor tools need some words of data to back up essential
registers, we'll add these to the UserRam area We also need to define @data and @code so the monitor works the same as DOS... We also define SmallScreen - this tells the monitor our screen is <32 chars wide. |
 |
| The Monitor tools need a PrintSpace function |
 |
| We need to include the monitor tools as a separate file. |
|
 |
We compiling for
Wonderswan and WonderSwan color - but we're not trying to make
a cartridge that works on both. If we were clever, we could do some kind of 'hardware detection' and switch to different init routines. But it's just for fun!... we're only trying our games on emulators... if you're trying to make a commercial release, maybe you'll need to 'try harder!' |
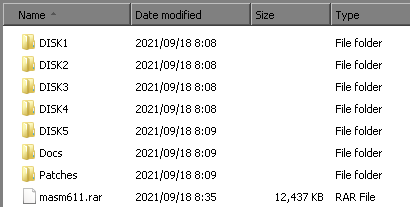
| We'll need a copy of
MASM611 somewhere... the one we're using here was downloaded
from this
site. |
 |
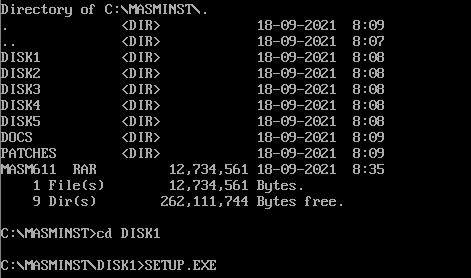
| In this example we'll use the copy of MASM
found here, First we should extract all the folders from our MASM archive into a folder on our Dos C Drive. |
 |
| To start the installation we need to go in to the DISK1
folder of the files we just extracted Next we run SETUP.EXE |
 |
| Install the software 'using defaults' (Option 2) |
 |
| We'll use the MASM 'Programmers WorkBench' to write our program,
but we need to set up the environment variables So lets create a batch file called "PWB.BAT" in C:\MASM611 - either with EDIT in dos if we have it, or NOTEPAD in windows. First we call the batch file 'NEW-VARS.bat' created by the installer. then we run PWB.exe in the BINR folder We can now run PWB to start the programmers editor |
 call binr\NEW-VARS.bat binr\PWB.exe |
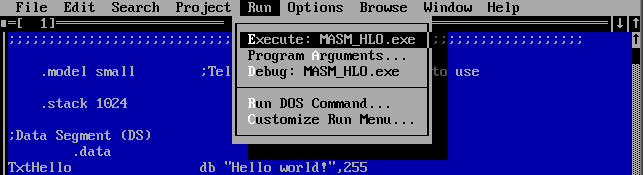
| We can assemble our program with the EXECUTE
command from the RUN command |
 |
| Rebuild All will assemble our
program |
 |
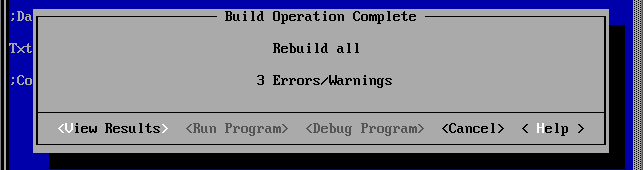
| Oh Noes! we have errors!... Click View
Results to see what went wrong! |
 |
| We have done a naughty! Lets fix the bugs in our code! |
 |
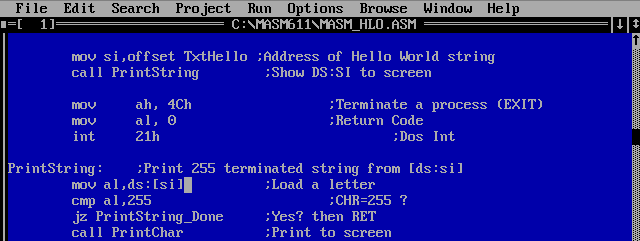
| We need to change [ds:si] to ds:[si]
on line 24 of the old hello world example We also need to add END to the end of our program |
 |
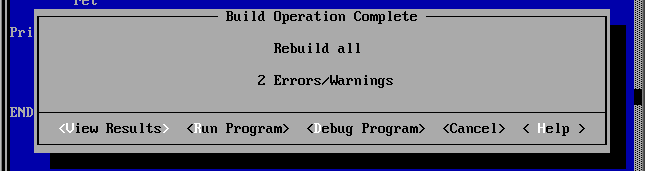
| If we build again we will get 2 warnings... but we don't care
because we like to live dangerously and have no fear! Select Run Program |
 |
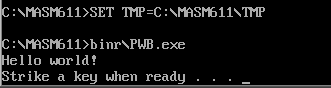
| Our program now works fine! Hurrah! |
 |
|
It
should be noted that using DOS is likely to make things harder
for us programming than our advanced windows 7 machines (or
even sucky windows 10 ones! :-P) So this isn't really the 'easiest' way to write dos programs! |
|
The PC 9821 hardware is
totally different to the IBM PC, and the bios calls all work
differently too... however, there was a version of MS-DOS
released, and the INT calls to DOS work the same. This means we can actually assemble the standard DOS Hello World and it will run on the PC9821, but in this example we'll do something different, draw characters direct to the memory of the Text layer! |
| 20 bit address | Purpose |
| $A 0000 | Text Characters (2 bytes per char) |
| $A 2000 | Text
Attributes %GRBVUrbs (V=vertline U=Underline r=reverse b=blink s=secret (1=show / 0 = hide)) |
| $A 4000 | CG Window 4k |
| $A 5000 | |
| $A 8000 | GVRAM0 Plane 0 B |
| $A BE80 | GVRAM0 Plane 1 B |
| $A FD00 | |
| $B 0000 | GVRAM1 Plane 0 R |
| $B 3E80 | GVRAM1 Plane 1 R |
| $B 8000 | GVRAM2 Plane 0 G |
| $B BE80 | GVRAM2 Plane 1 G |
| $B FD00 | |
| $C 0000 | EMS Memory Window 32k x 4 |
| $D 0000 | Kanji Ram |
| $D 4000 | Dictionary Rom |
| $D 8000 | KGC Rom |
| $D C000 | |
| $E 0000 | GVRAM3 Plane 0 I |
| $E 3E80 | GVRAM3 Plane 1 I |
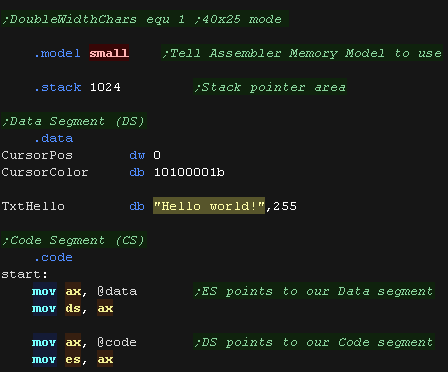
| First we're going to define our program type to the assembler
for a basic program .model small will work
well. Next we need to define a stack - we'll define 1024 bytes with .stack 1024 We'll define a data segment (DS) with .data... we'll put our 'Hello World' Message in there We also store two bytes for the XY position in characters of our text cursor. Finally we store one byte for the color of the characters Next we need our .code segment... We'll start our program by initializing the DS and ES registers to the data segment and code segment |
 |
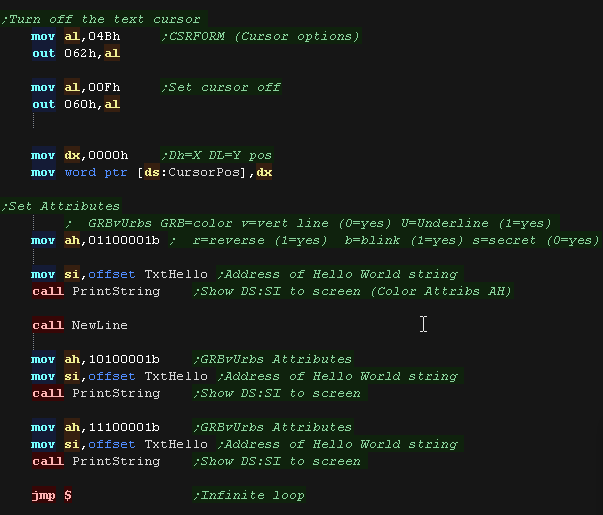
| First we turn off the flashing Text Cursor by OUTing to ports
62h and 60h If we wish we can change the font size to double width with port 68h |
 |
| To print a character to the screen we write the
character number into VRAM VRAM is in segment A000, Each character is 2 bytes, and there are 80 characters on a line (In 40 Char mode, there are two unused bytes after each character, so each line is still 160 bytes! We calculate the VRAM of the character, and write the character number in VRAM We then add 2000h to our VRAM destination, moving to the matching character attribute, and write that too! |
 |
| We'll use this PrintChar routine to print a Char 255
terminated string We'll create a function called 'PrintString' which will print the string at address [ds:si] The colors are defined by the value in AH |
 |
| When we want to start a new line, we do this by setting CursorX to zero, and incrementing Cursor Y |  |
| When we want to show the string, we need to make sure ds:si
points to the 255 terminated string, We load AH with the color attribute byte. Here we show our string in various colors |
 |
| Here is the result! | 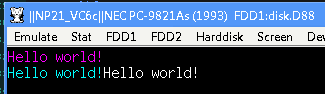  |
| these tutorials use UASM
as an assembler, it's free and MASM compatible! We compile it on the command line with the following command:  Defined Symbols... We're defining some symbols on the command line (equivalent of the equ command).. you don't need this for the basic hello world MZ = EXE... MZ tells the assembler we're buiding an EXE file (rather than a COM file) Listing File... we're specify a listing file - it shows the source and resulting bytecode, it's for debugging, so you don't need it, but it helps! Output file... this is the resulting program file Source file... the ASM file we're compiling, in this example %buildFile% will be defined by the batchfile - it would be Hello.asm or something if you're writing your own build script |
|
| The file will be built into a DOS EXE file... We can run this with the PC emulator Neko Project II |
|
| We're using NDC
to alter disk image, I created a bootable dos disk image in the emulator, and we patch the new EXE into it. First we delete the old copy of the EXE with the 'd' switch (if it exists), then add the new one with 'p' |
 |
| We can set up an Autoexec.bat to automatically start our program |  |
| Here is the result | |
|
COM
Files are limited to 64k in entirety - the .data and .code
segments must all fit in 64k EXE files are more flexible Due to the removal of backwards compatibility, neither will probably work on modern machines - at least if they are 64 bit. |
| In these tutorials we use some software debugging tools, A Monitor which shows the state of the registers, a Debugger which shows some lines of the memory |
 |
| Here is the result |  |
| The monitor tools need some words of data to back up essential registers, these should be defined in the DATA segment |  |
| The Monitor tools need a PrintSpace function | 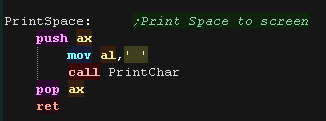 |
| We need to include the monitor tools as a separate file. | 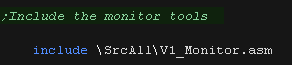 |
| Writing
your own monitor tools may seem a bit odd, but writing our
own means we don't have to worry about the functionality our
emulator does or does not provide. The Monitor tools are pretty complex, so we're not going to discuss their workings here! |
|
